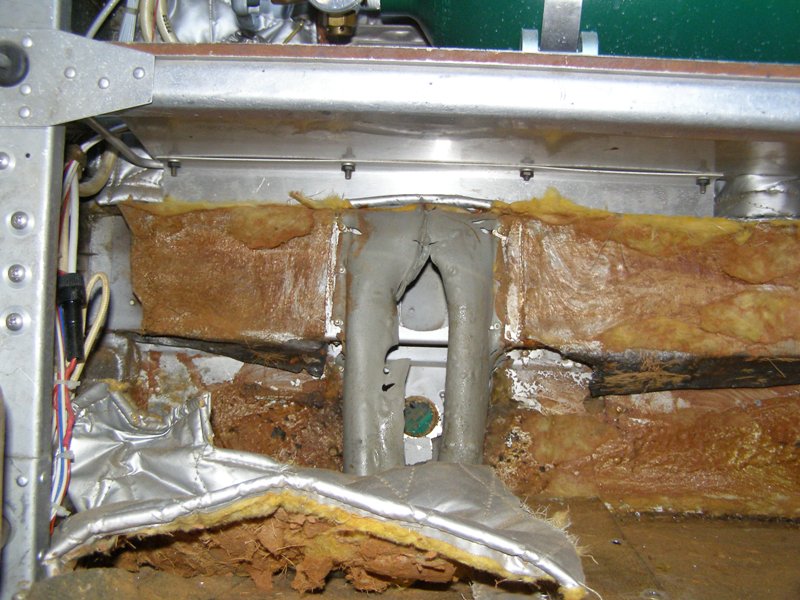
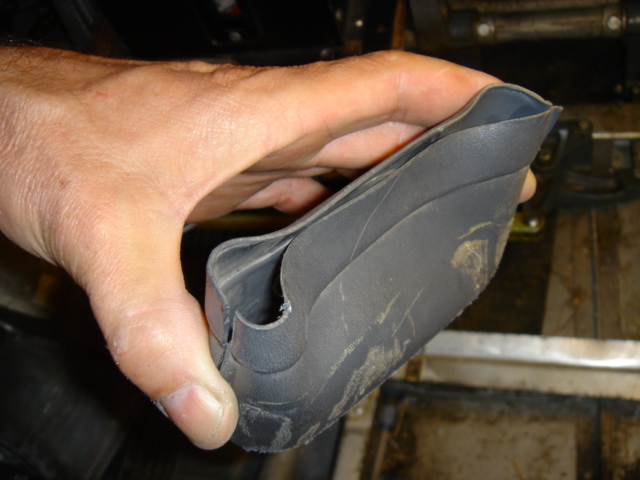
See pictures below of duct areas that get hot and take a beating in the
heating system.
These are pics of a
C&D Associates
find that was lurking under the floorboards of a Baron. Well this explains why
there was no heat getting to the rear of the airplane. Can you say "thorough
annual" where the floorboards are lifted to take a peek at things?
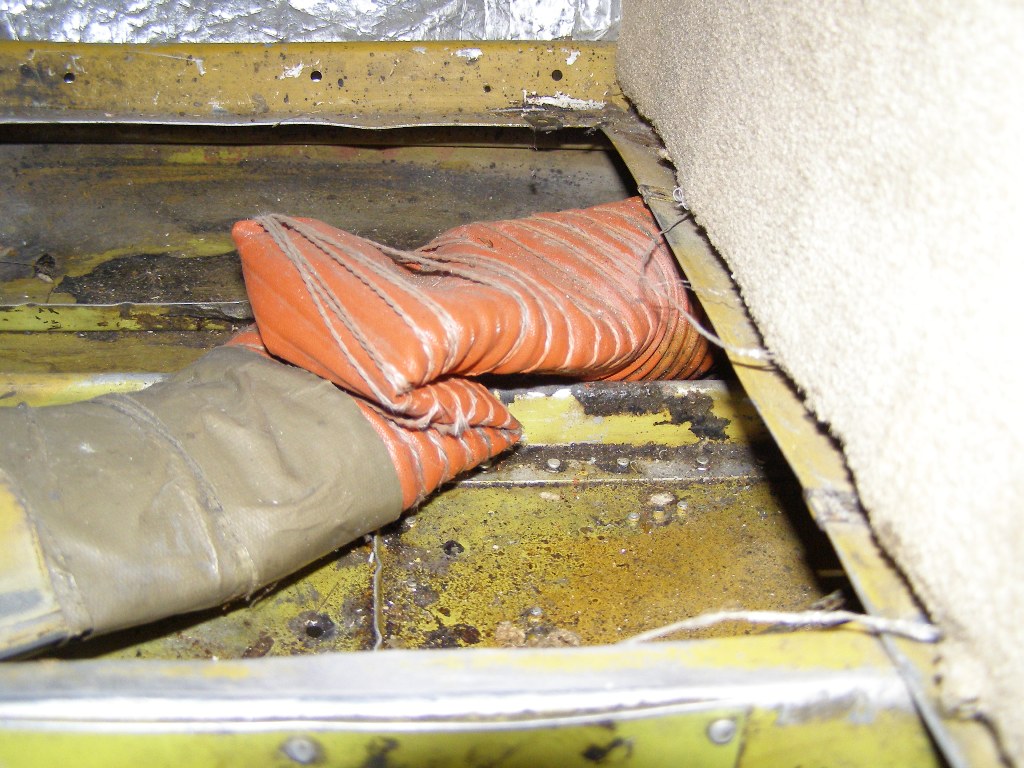
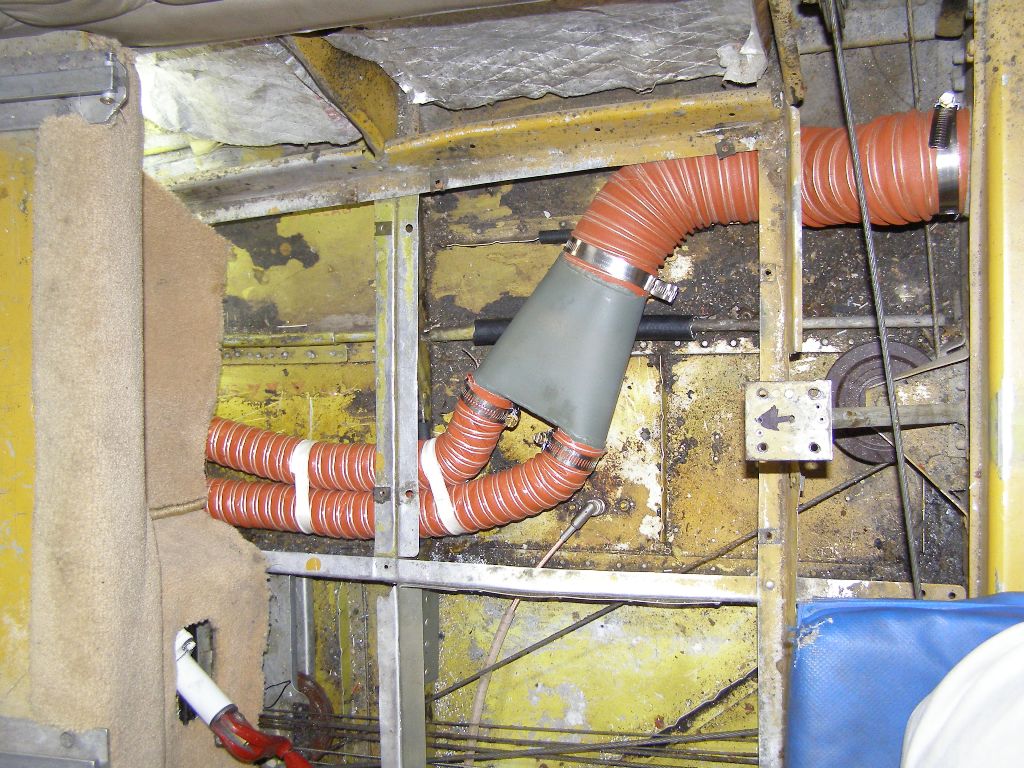
Here are more pics of distorted
plastic duct work that could be lurking under your floorboards
The ducts are thermoformed plastic. They soften and melt when they get
hot. This owner repaired the bad joints in his Baron with fiberglass and
reports not having any problems since.
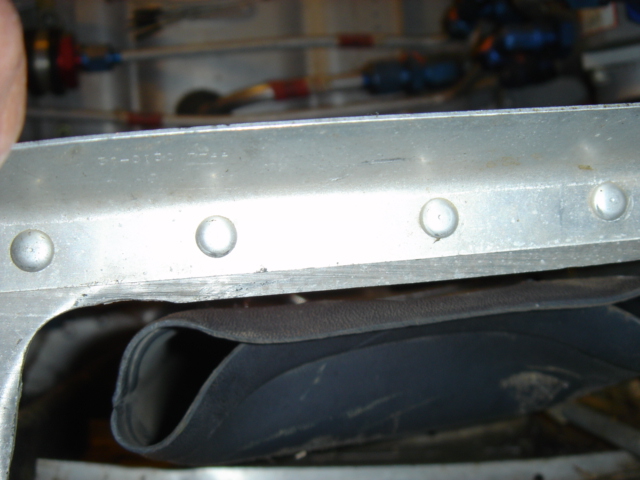
Below is the fix
C&D
employed in straightening out the mess:
Below you will see pics of all the exciting pieces that
go into a Janitrol Model S50/D83A28 heater that was factory equipment for the
early Baron and Travel Air (probably up to 1973 vintage, but check your parts
catalog to be sure).
Section 10 of the Beechcraft Maintenance Manual also has
some good guidance for Janitrol heater maintenance as well and you should follow
those guidelines. Here is some source material:
Carbon Monoxide Myth from Janitrol Style
Heaters Article HERE
Nexus Climate Systems
in Holland, MI 888-701-Four-Seven-Six-Seven is a source of parts and
service for Janitrol Heaters. Here is a recommended list of parts from
former C&D owner, Bill Sandman, to get the S-50 heater back into
winter fighting shape:
• G36A47: Nozzle, fuel 2.00 GPH • 54A35: Spark Plug (gap 0.312 to 0.250) • 51A66: Nozzle Holder Gasket • 52A02: Head Gasket • A35A71: Rope Gasket (8”X3/8” for S-50) • 51A05: Serviceable Ground Electrode • The package also included a foot of 7mm lead material (to overhaul the ignition lead).
1/29/2013 NEWS FLASH from
C&D:
C&D Associates Inc., manufacturer of the world’s safest and most reliable
aircraft combustion heaters, is proud to announce "A.D. FREE" overhauls of both
JANITROL and SOUTH WIND/STEWART WARNER heaters.
As always, C&D’s Dash one (-1) series heater remains A.D. free (After 16
years and 3500 plus units in service with zero malfunction defect reports under
our belt.) Confidence in product safety now allows us to offer the C&D Durakoat™
combustion chamber as a cost effective alternate means of compliance to
Airworthiness Directive(s) AD2004-21-05 (imposed on Janitrol B-Series previously
AD96-20-07, previously AD82-07-03,) and AD81-09-09 (for South Wind/Stewart
Warner.) These A.D.’s will no longer apply to units undergoing complete
zero-time overhaul by C&D Associates Inc. Resulting in better-than-factory-new
condition, these overhauls will utilize C&D’s Durakoat™ combustion tube as well
as multiple updates necessary for longevity and safe operation.
Thanks to the most knowledgeable staff in the industry and an extraordinary
record of safety, C&D Associates Inc. continues to set the bar on aircraft
environmental systems. In an effort to promote aviation safety in this regard,
C&D will offer the complete overhaul at a cost similar to the purchase price of
the combustion tube itself.
Here is what C&D has to say about Janitrol nozzles and spark Plugs:
Its really tough to clean a heater fuel nozzle. Plus if the spray pattern
isn't verified out of the heater it's hard to tell what its doing IN the heater.
A great way to tell if you have a nozzle problem is to hold a piece of metal
flat but loosely against the exhaust while its burning. If the burn pushes
smoothly against the metal then your spray pattern is probably OK. If it chug's
or pulsates against the metal as it burns then a NEW nozzle (or overhaul) is
needed.
Also, cleaning a plug with a rag and maybe a mild 3M pad is fine. If the plug
was sandblasted its basically trash. That glazing on the ceramic is vital for
proper ignition. And just as important as a clean (New) plug is on a Janitrol, a
properly set gap is just as important. Verify its 0.156" -0.188".
Call today for a quote: 855-234-3287! Availability typically runs 5-7 days (AOG, 24-hours.)
C&D Associates Inc.
Your complete source for A.D. free aircraft combustion heater products and
parts.
855-CD-HEATS (234-3287)
PS: C&D Associates is now part of the Hartzell Family of companies.
The good news is that they make these parts
available, the bad news is that they are horrendously expensive! When was the
last time you bought a spark plug for $100? (You fine wire guys sit down and
shut up........LOL). But seriously, the plugs in these units give quite a long
service life with a little care and cleaning.
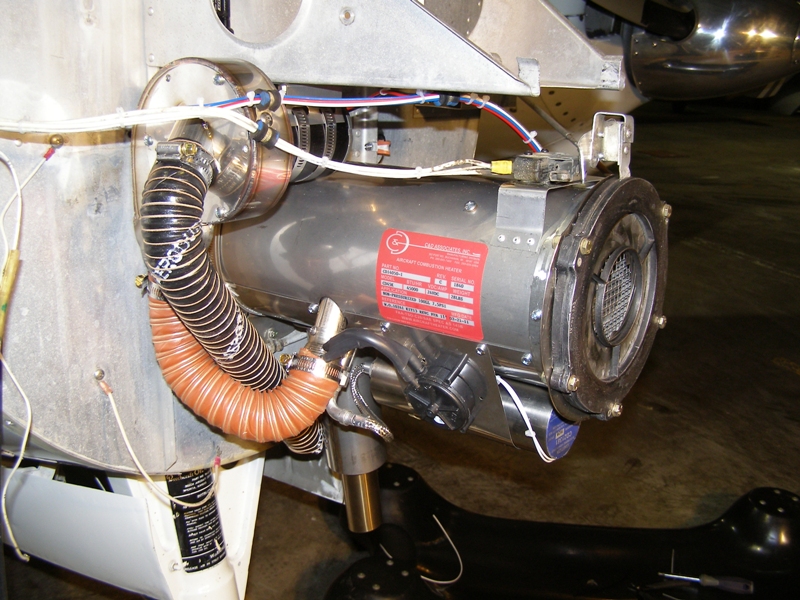
If an $8,000 new C&D Heater (by the way -
they have AD Free models available for Beechcraft) is not in the
cards for you (like the one pictured below), then read on and see the ideas for getting your Janitrol
back in action!
Here is another resource for Janitrol Service
and Parts:
Harold Haskins
116 Race Track Rd.
Dothan, AL
(334)-873-4116
And yet another source for Janitrol Parts is
Cumberland Aero.
Baron owner Pete R. reports Cumberland had the best price for the spark plug.
Cumberland Aero
121 Boss Lane - Boss Airport
Bronston, Kentucky 42518
1-800-524-6319 or 606-561-5260
And yet another source for Janitrol Parts &
Service is Aircraft
Heating & Electrical.
Baron owner Pete R. reports that he had an AOG situation when his heater igniter
went TU in the winter of 2016. John at Aircraft Heating received in his unit and
diagnosed and repaired it in the same day, getting his bird back into winter
service the next day. Pete reports the repair at about $300, which is about the
cost of a serviceable unit off eBay without any warranty. The typical Janitrol
igniter PN 11C30-1, is pictured below. This is the unit that provides the
electrical energy that goes down through the ignition wire that connects to the
spark plug whose spark ignites the fuel in the heater can.
Despite the horrific expense of these parts,
this model of Janitrol seems like a pretty robust design and with regular
bi-annual maintenance of the spark plug, electrode and your original nozzle,
things should be toasty warm, but that's just my humble opinion.
CSOBeech Bonus Find:
Heater Fuel Pump Filter Kits are PN: FEP 42370 available for half the price of
HBC at around $7 from Aircraft Spruce
HERE. Consists of a new filter screen and a new gasket. Better to change those
while you're in there as they are often neglected for decades
Here is a picture of the old style filter for
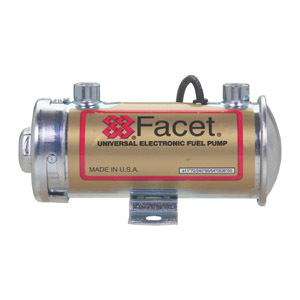
the Facet pumps:
Looks like these Baron/Janitrol heater fuel pumps (2)
were/are
Facet Cylindrical 24V Solid State Pumps. Later model B55s are reported to
have only one pump.
1.
I learned that in addition to a good clean nozzle,
spark plug and electrode, a very important piece of the heater equation is the
spark plug wire
.
I found severe arcing through cracked wire
insulation in the ends that was contributing to poor/intermittent heater
performance. Gee, it was only a 40 year old wire! So, make a note to self,
change out that spark plug wire if it is decades old.
My IA had some solid core wire and ceramic
insulating ends, however, C&D
has a repair kit consisting of fresh wire and connector ends that will enable
you to make up a new wire to fit inside your existing braided connector. Use
some safety wire and a liberal dose of
DC-4
to pull your new spark plug wire through the
semi-rigid braided connector.
2.
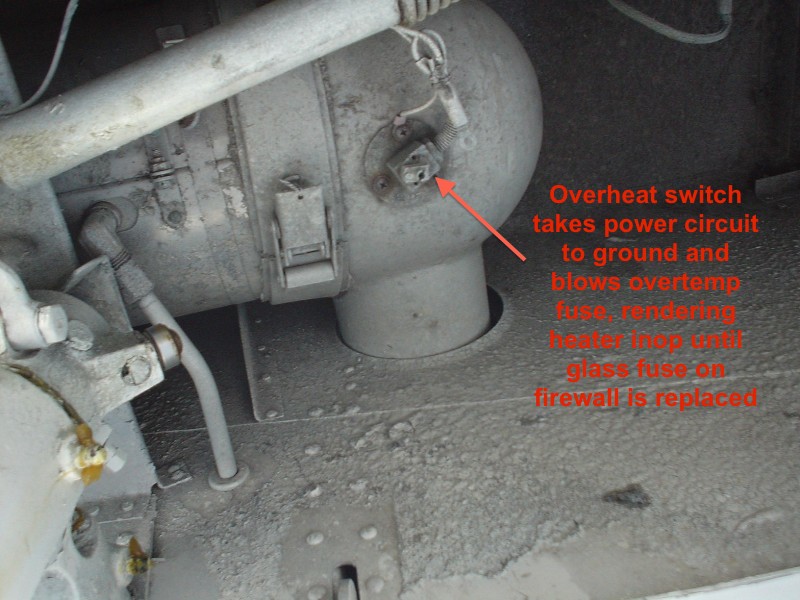
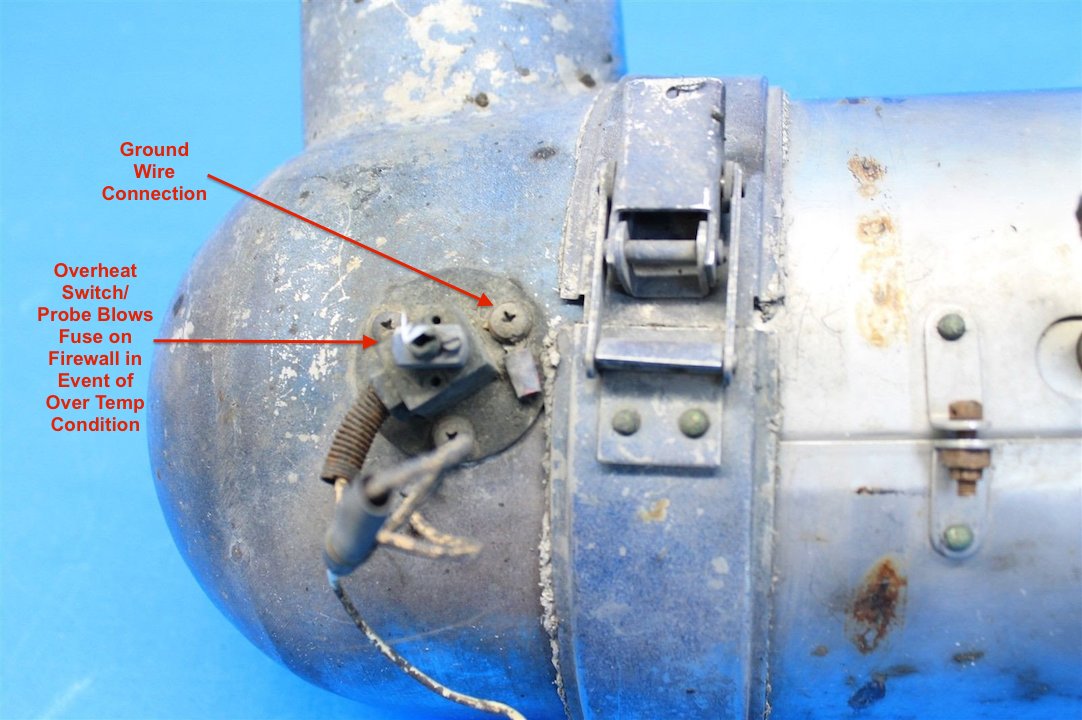
I also tested the overheat circuit of my S50 heater
to be sure that the unit shut down as designed at the 300F plenum temperature.
The overheat thermostatic switch resides in the furthest aft position of the
heater, just aft of the heater combustion chamber. (PS: This picture was
taken in 2004 to point out to the selling broker that the overheat switch was
not connected to ground)
What I did to check mine was run my heater at
highest heat setting in my hangar with about +1C ambient air temperature. I used
an infrared pyrometer to measure the plenum temperatures at the rear of the
heater and in the plenum duct on the co-pilot side where the thermostatic switch
is located.
I found that under these conditions my
overheat switch functioned and did it's job of blowing the 5 amp fuse in the
circuit. My IR pyrometer recorded a plenum duct temp of about 235F downstream of
the location of the overheat switch. The overheat switch is fed from the same
power source as feeds the ignition coil, fuel pumps and fuel solenoid valve, so
when the other side of the overheat switch goes to ground, my heater no longer
has fuel or ignition.
We made an adjustment in the thermostatic
switch cable:
so that the highest heat setting makes for a
lower plenum temperature (about 210F) and does not blow the fuse.
My subsequent trip north at 11,000' with an
OAT of -8C allowed for low heat settings to make the cabin quite comfortable.
I'm expecting that when we get colder OAT temps, I'll have enough heat setting
to be able to be comfortable.
If you live or travel to frozen tundra
territory in your Baron or Travel Air, things get mighty uncomfortable in a
hurry in the winter temps that can be experienced up there at altitude, so
make this a definite checklist item for your annuals or check it every two
years.
NOTE: All of the below operations were done
under appropriate A&P supervision, so get yourself some supervision or help
your A&P/IA with a link to this page so that they can be briefed on what to
expect in there if they have never done these heater maintenance operations.
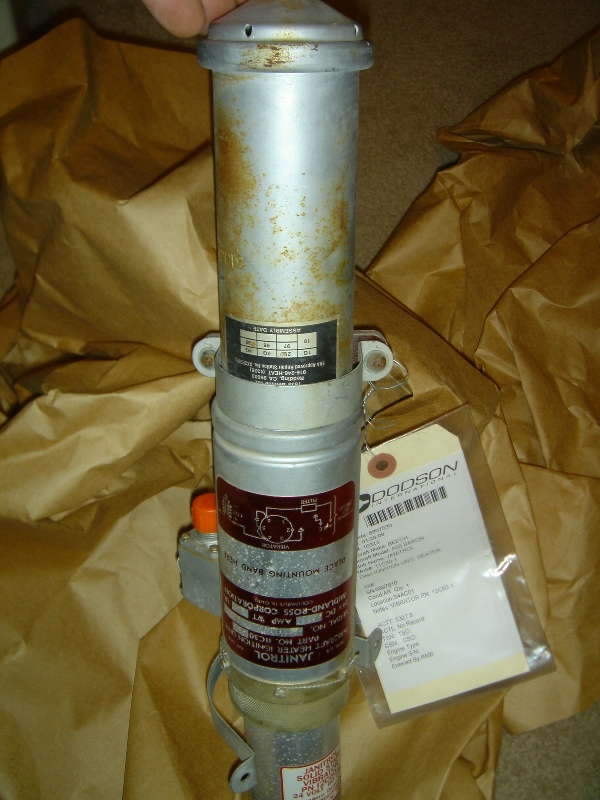
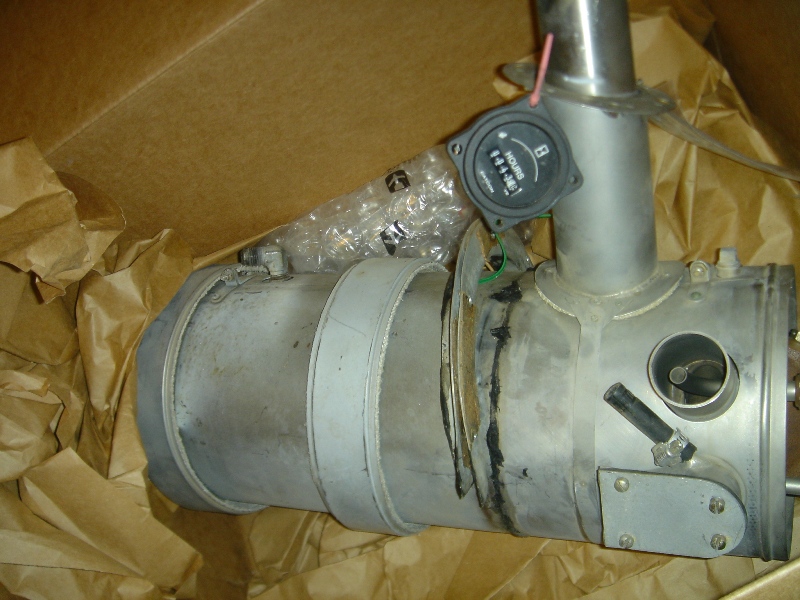
25 November 2009 NEWS FLASH:
GOOD NEWS, Mark M. @ Dodson
came to my rescue with a complete low-time (yeah they included the Hobbs showing
43 hours) S50 Heater for about the same cost as some of these guys get for a new
Ignition coil/vibrator combo! If you have heater woes give Dodson in Kansas a
call (785) 878-4000 and tell them CSOBeech sent you.
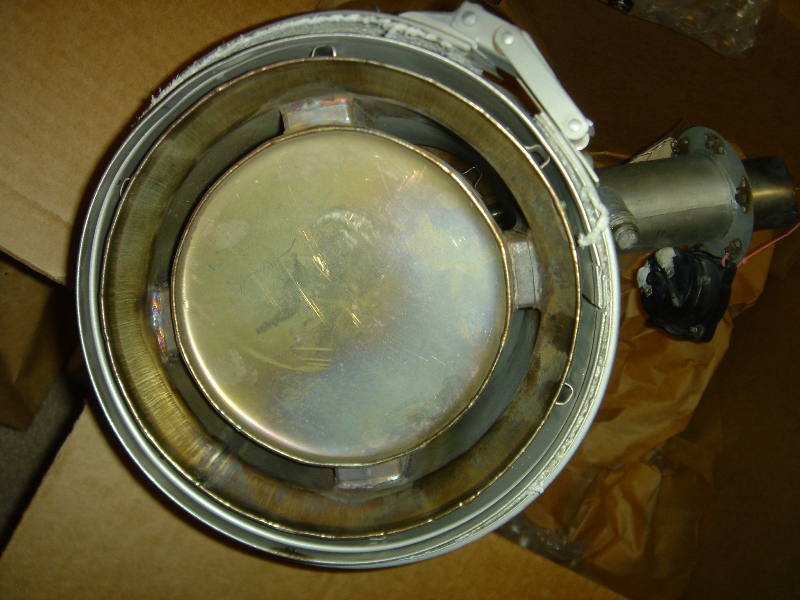
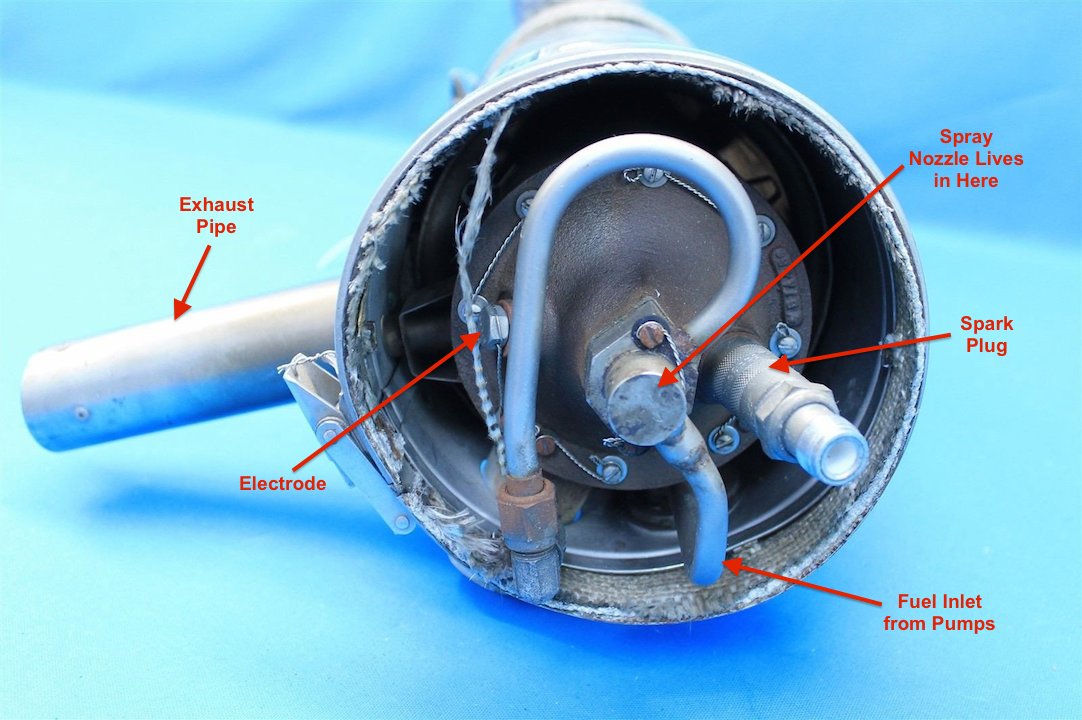
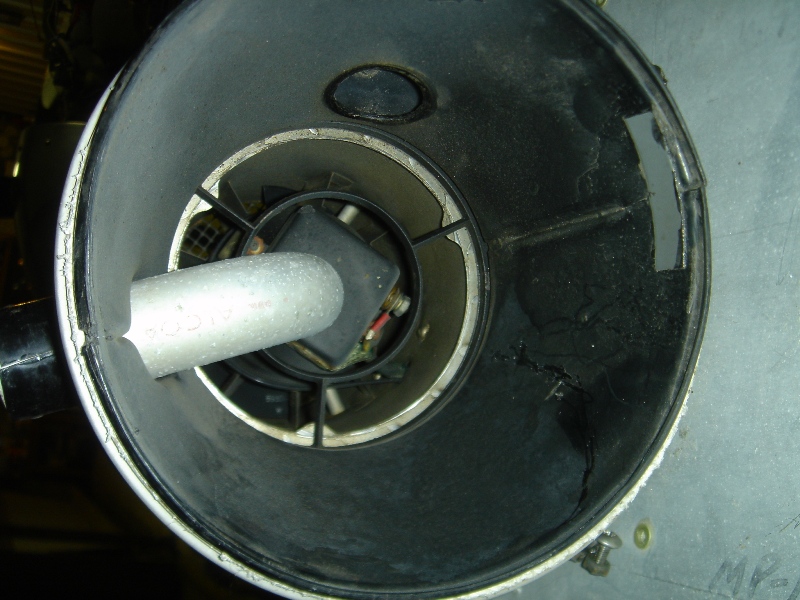
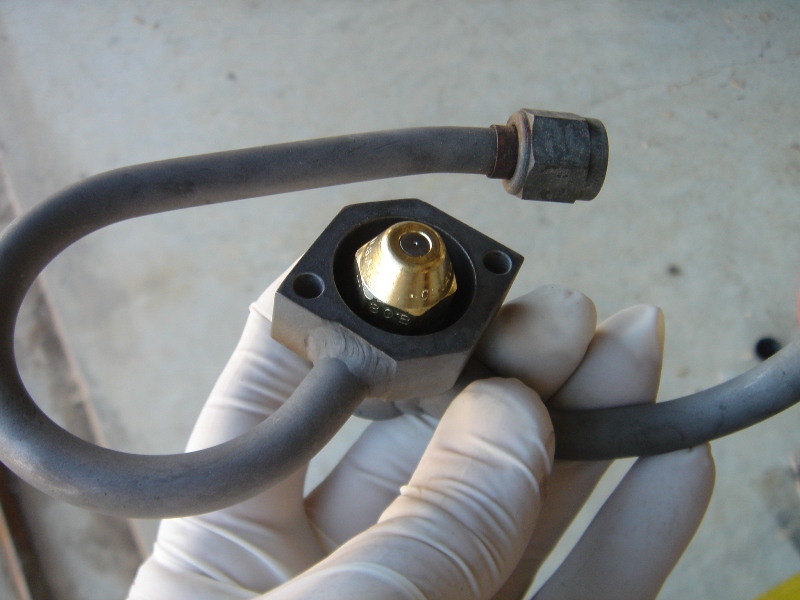
This is the heater head where
all the business parts are fitted. At 12 o'clock is the $100 Spark Plug
. At the 6 o'clock position is the electrode, the spark plug and electrode meet
in the center
with a gap for spark
arcing. At the center position is the fuel spray nozzle which gives a fine
spray of fuel to be lit
off by the spark.
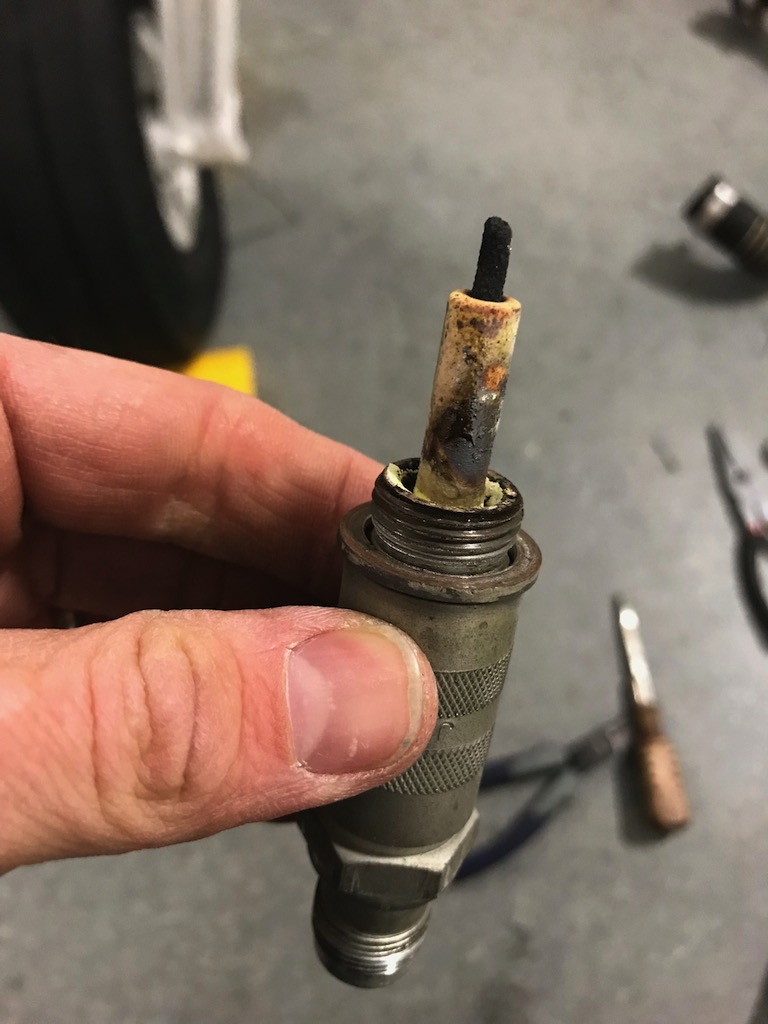
While we are talking about
spark plugs in these heaters, check out what Bill Sandmann of
C&D Associates found
when he was troubleshooting a customer's "no-heat" squawk!
Yup.....the electrode is
completely gone!
Below are a few more gems for
"intermittent" or no heat out of your Janitrol.
These are some of the surprises
that can be found when Janitrol heaters are not regularly maintained and inspected.
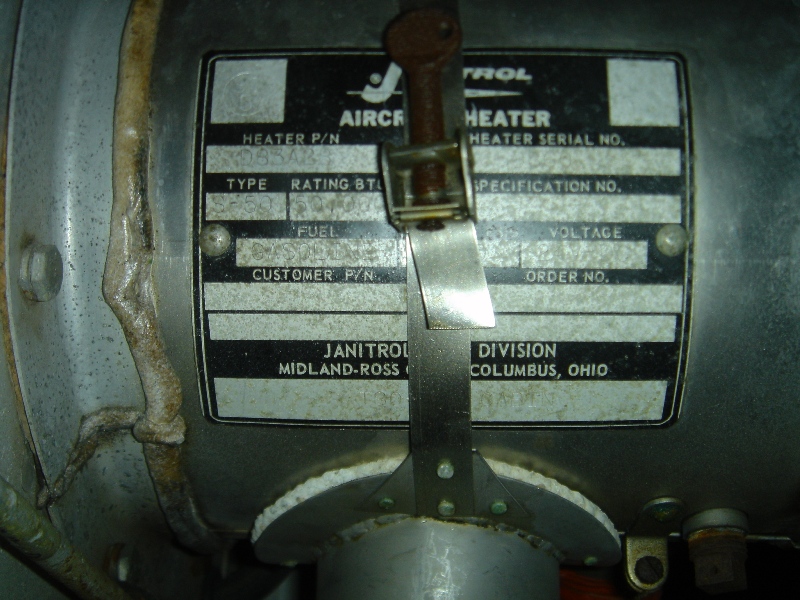
This is the heater data plate,
on the right side (co-pilot side) of the unit.
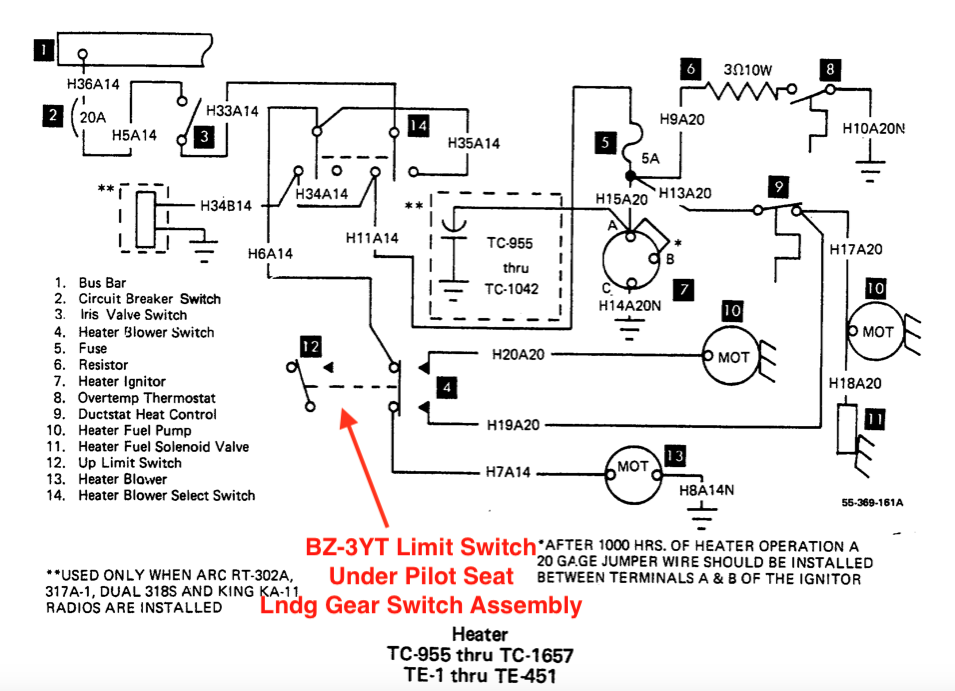
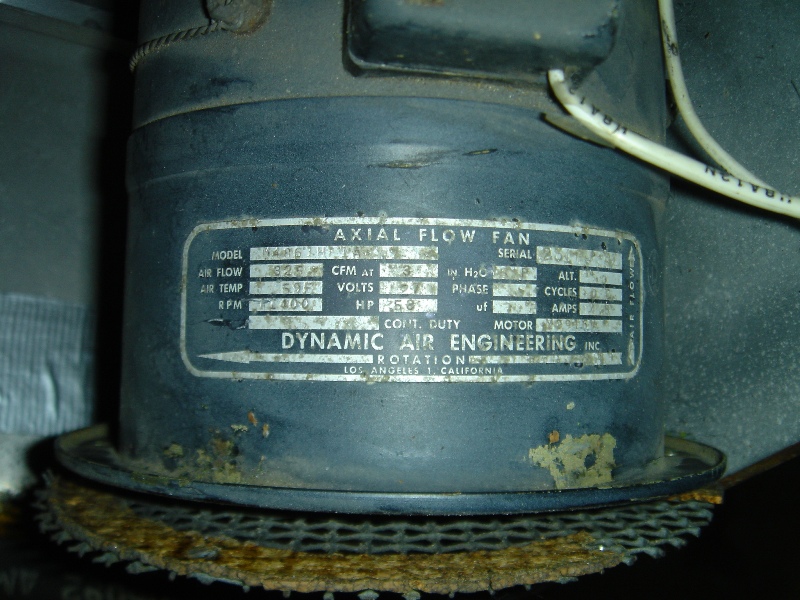
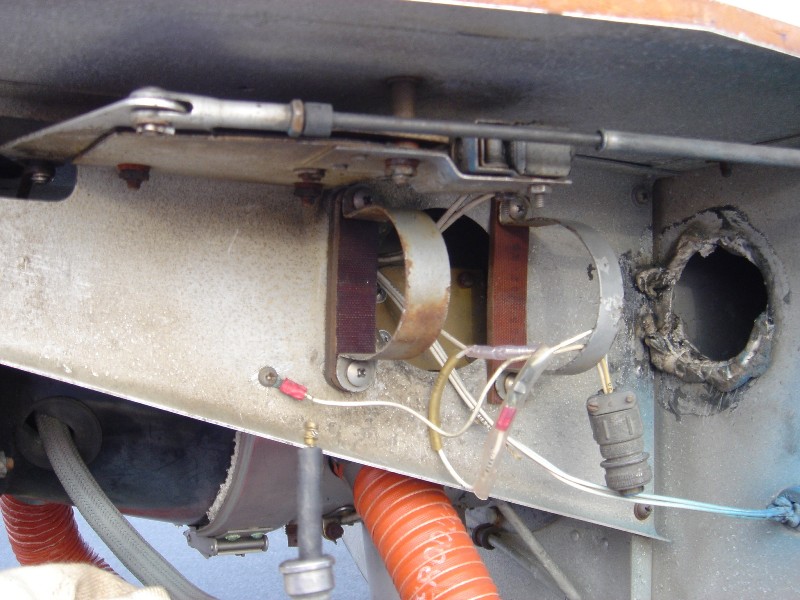
This is the heater blower that lives under the nose cone in front of the heater can. The first picture is
the front end and the one on the right is the rear of the blower assembly. This blower assembly
hangs
in the front by some screws and the rear by a clamping strap to the
front end of the heater. I made
sure the front end was clear of obstructionstoflow air. On the ground
the blower runs (and only ONE
of the fuel pumps fuels the heater), when the gear is in the wells
the blower does NOT run (BOTH fuel
pumps are actuated with gear in the wells),you
are running off ram air coming into the nose cone. An
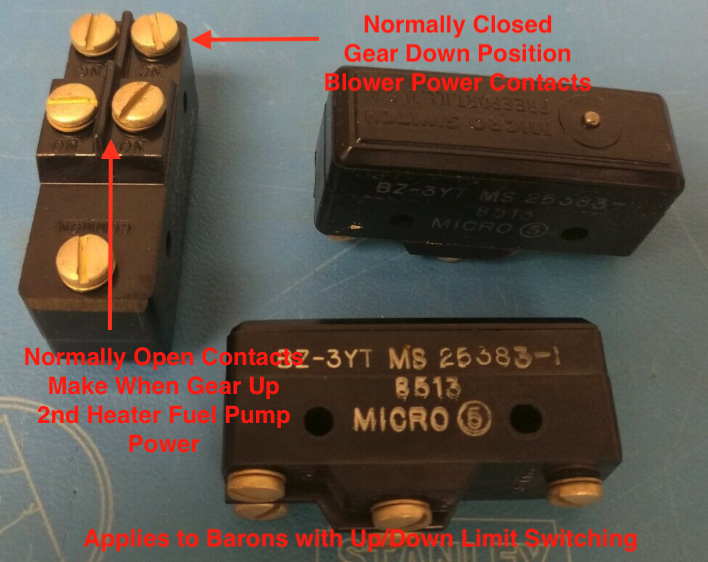
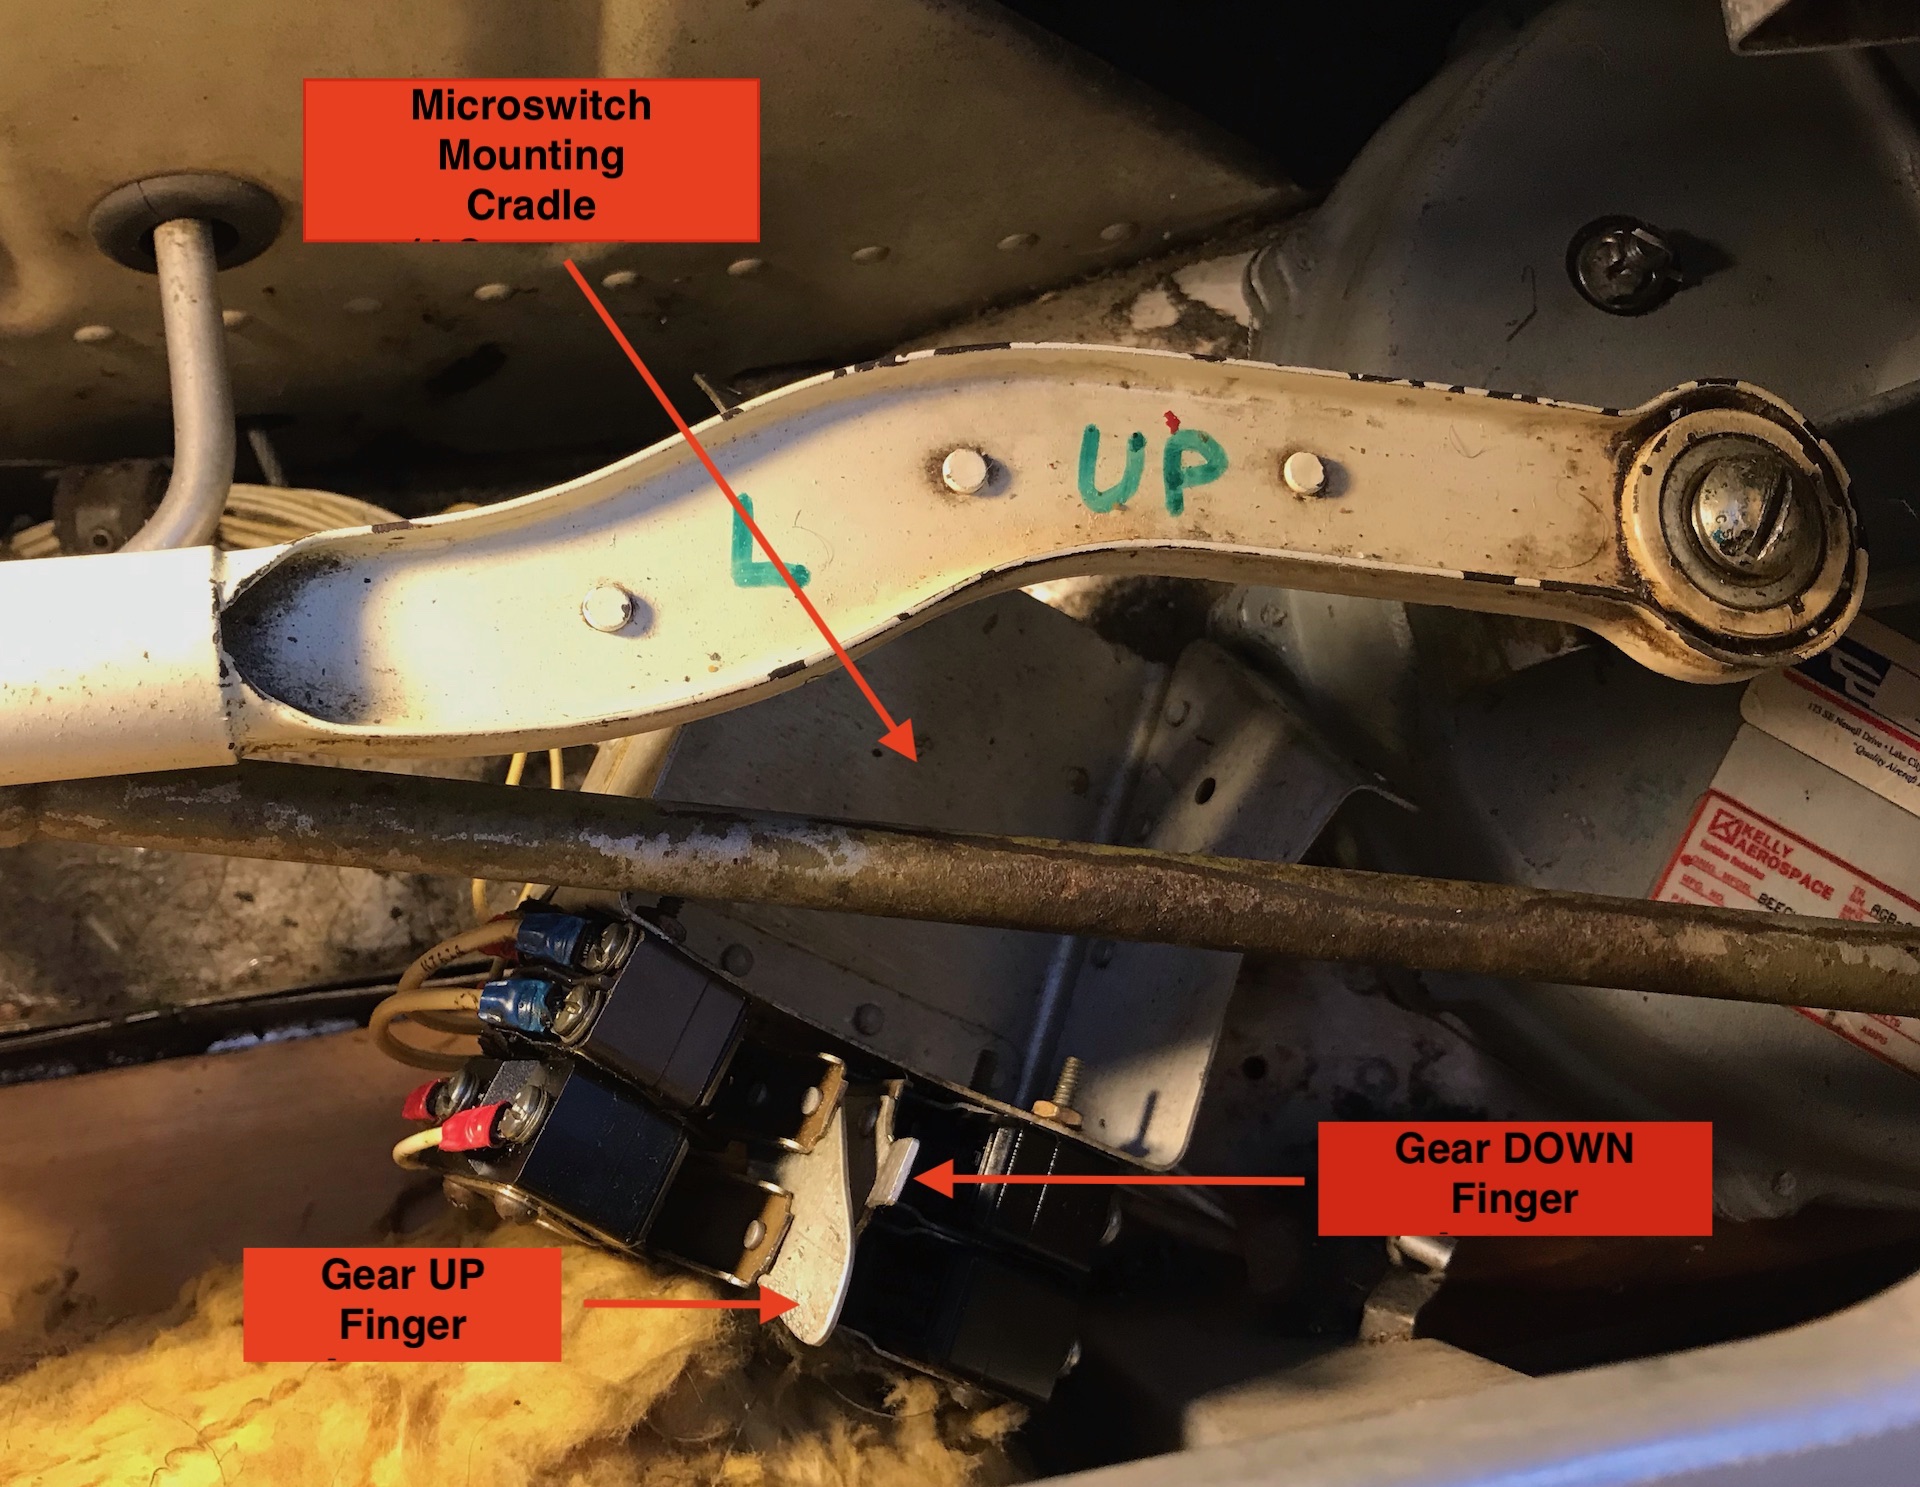
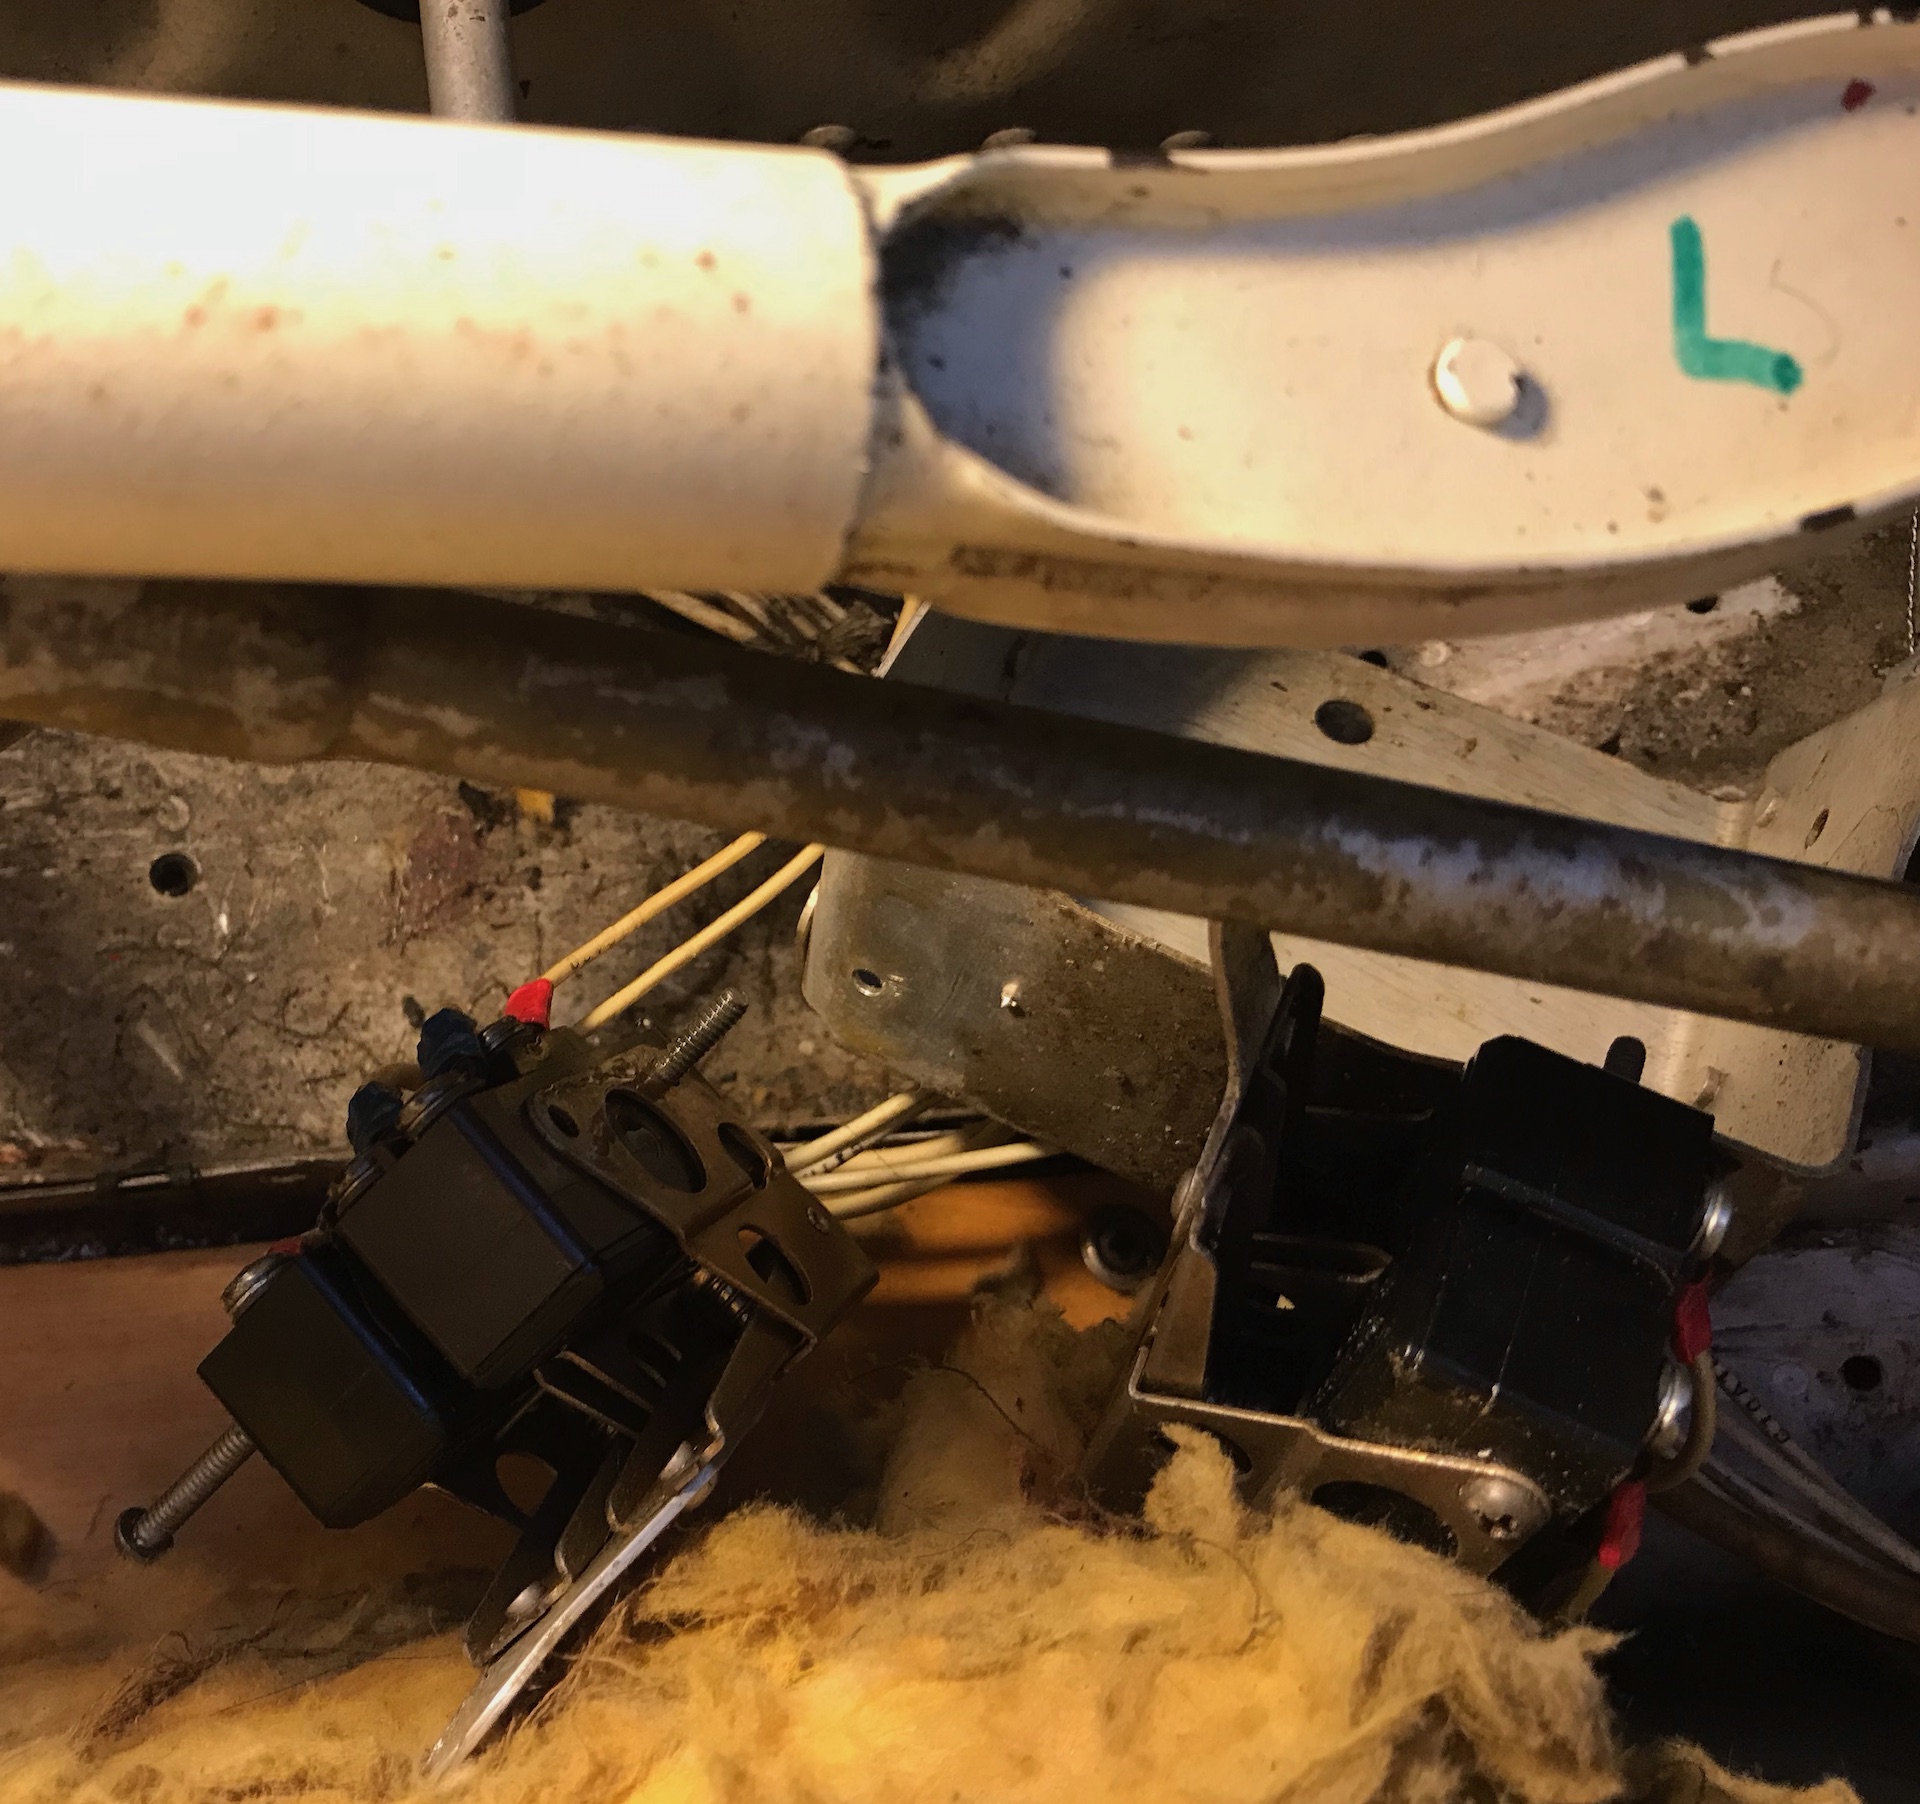
up-limit switch on the gear transmission switch assembly contains a BZ-3YT double contact switch
which allows power to flow to blower motor when the gear is down. When the gear is up the switch
contacts close on the other set and allow power to flow to the 2nd fuel pump. If your blower motor
decides to quit running on the ground, check for power at the motor connection in the nose cone and
if there is no power there, it is likely your BZ-3YT (SPDT) switch may have failed. Since the Common
terminal is not used, the BZ-3AT might also be considered (with A&P approval) for this task as well.
Need more landing gear gouge details? Check out this CSOBeech page HERE.
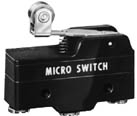
Support CSOBeech.com: Buy the BZ-3YT / MS25383-1 Micro switch below:
BUY NOS BZ-3YT / MS25383-1 Below
There is a shutter mechanism ontheblower,
this is called the "Iris Valve", you have a cabin air handle
on the
pilot side at the lowerpart of the instrument panel,
when you pull this handle you pull the
shutters closed on the Iris Valve and LESS air comes in the
cabin firewall vents. When you pull this all
the way closed a micro switch closes and shuts
the heater down because you are not flowing any air
and that would be very bad to have all
that heat happening and no air coming across the heater can
(DUH!) Cleaning the iris vanes
is a good idea to insure smooth operation. Many people suggest
pulling the Iris halfway to get
a warmer air temp into the cabin. I've not tried this technique as I'm a big
fan (pun intended) of
flowing as much air over that hot can as possible. You're the PIC, you decide!
Blower motor data plate
information.
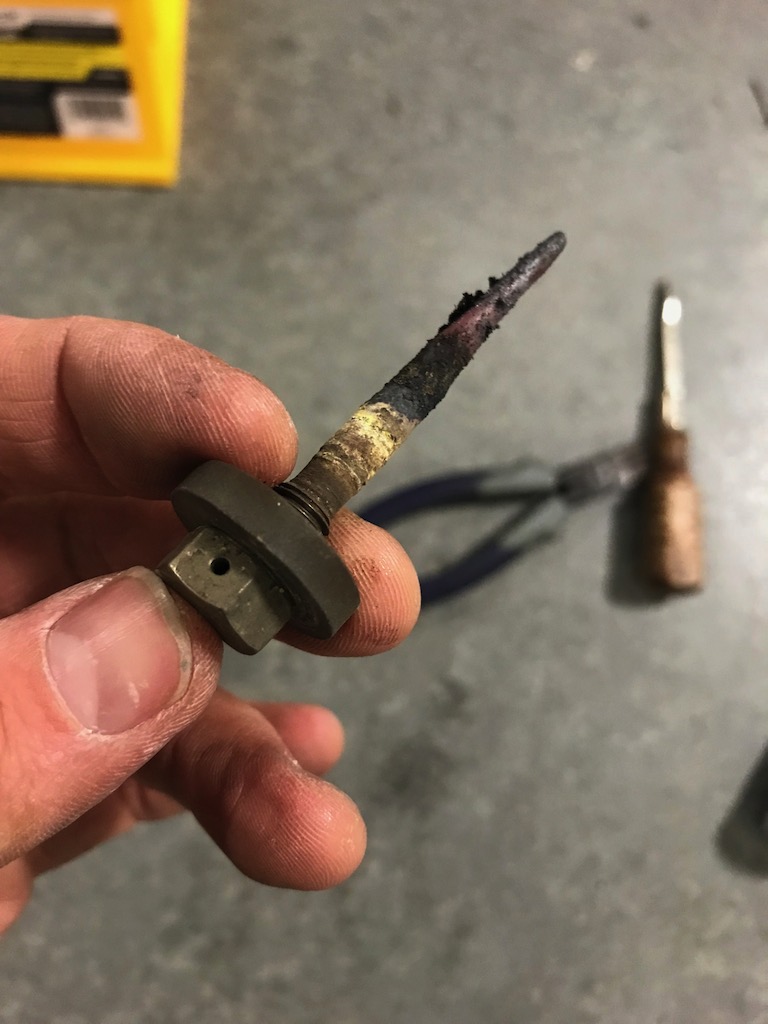
Dirty electrode removal.
Bead blasted electrode cleaned
up.
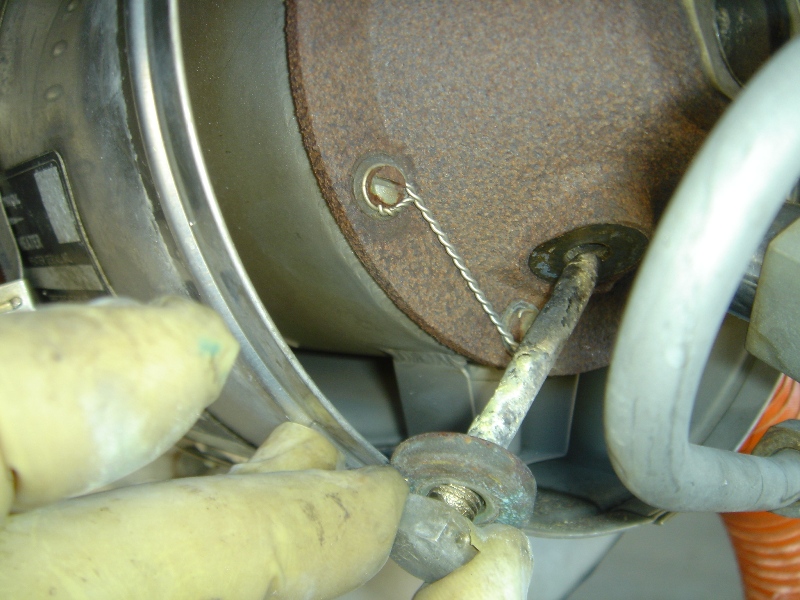
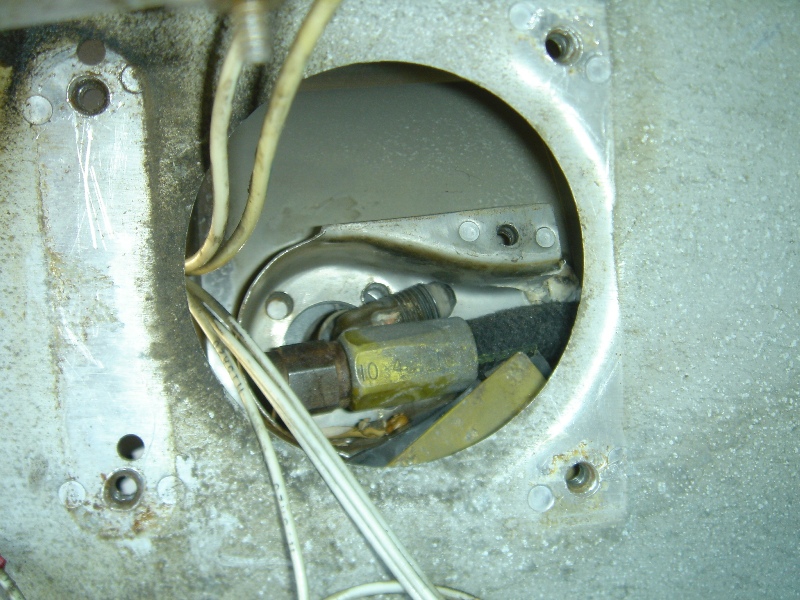
This is the area under the
heater showing the blower motor strap clamp to the front of the heater
assembly. The picture on the
right shows the Iris Valve actuating mechanism and the
micro switch and coil/ignition
vibrator location (coil/vibrator removed). I lube this area of the
mechanism regularly with
CorrosionX).
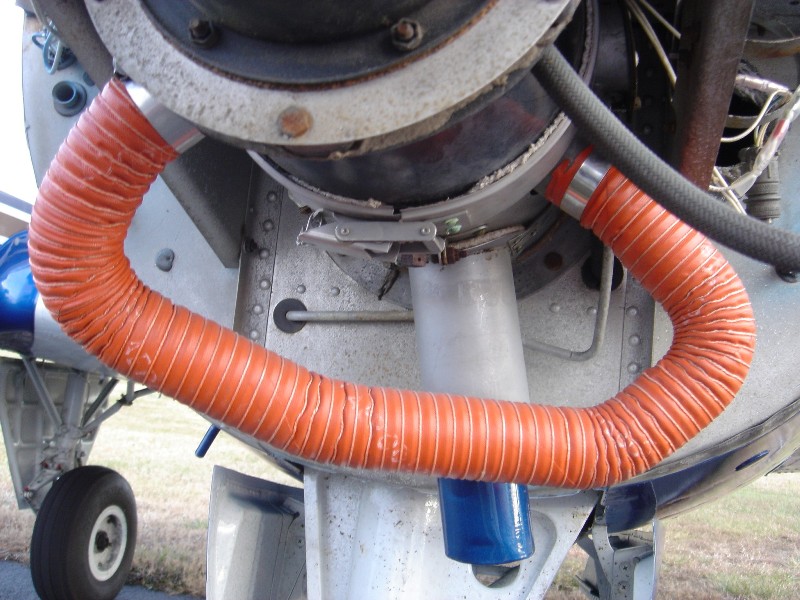
This is the area that must be
disassembled to remove the nozzle plumbing. This is directly behind
the coil and ignition
vibrator (torpedo looking thing) under the nose shelf. The coil/ignition unit is
held on by two band
clamps with phillips screws. See the screw holes in the picture. The
stainless enclosure has a
little cover on it with two long screws to the front and two short ones
to the rear. The two long ones
reach all the way down to the nozzle plumbing fixture. The two
short ones hold the cover to
the stainless enclosure. There are two screws in the base of the
enclosure that are securing the
nozzle plumbing to the outside of the heater can structure. I
left those in place for
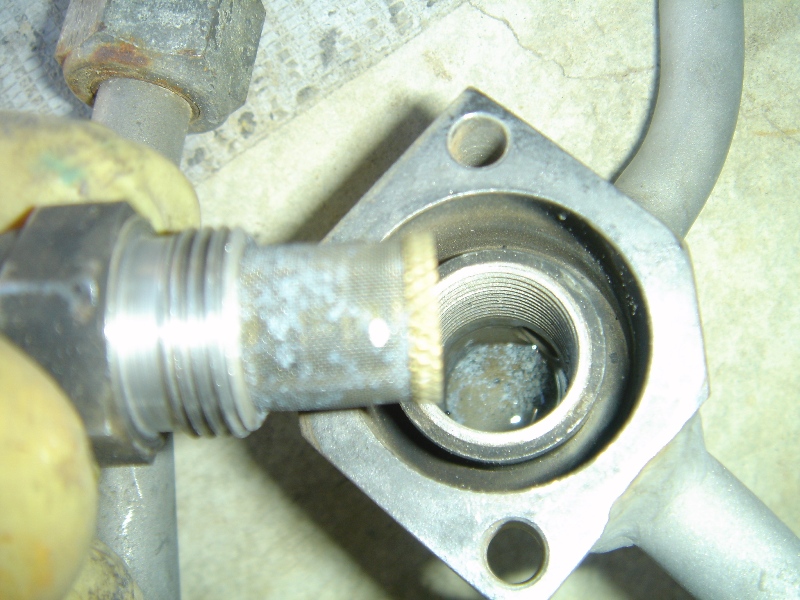
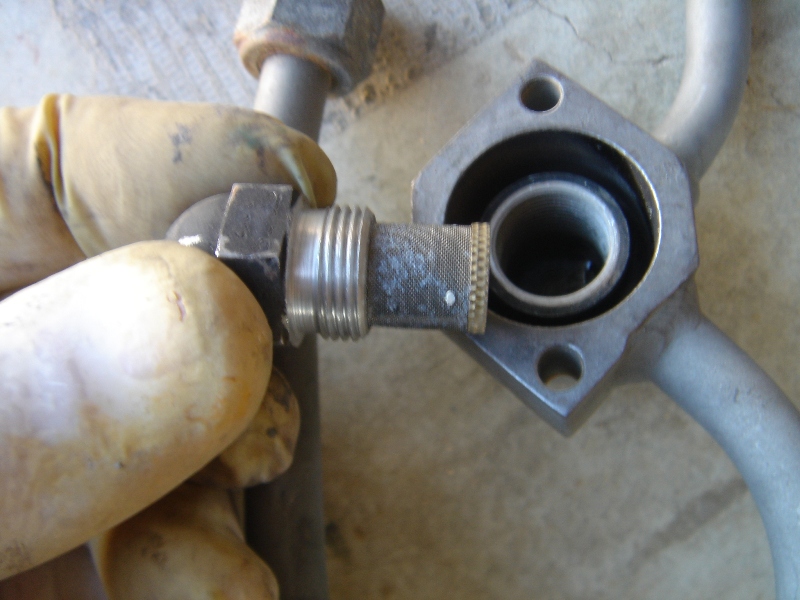
rigidity. I then removed the fuel line fitting going to the 90
degree elbow.
While holding the rear of the nozzle plumbing,
I fit a small wrench in there to loosen
the 90 degree
fuel fitting. After I removed
the 90 degree fitting, I removed the last two screws to
the rear of the
nozzle plumbing fixture and the whole
piece of plumbing to the nozzle was then loose.
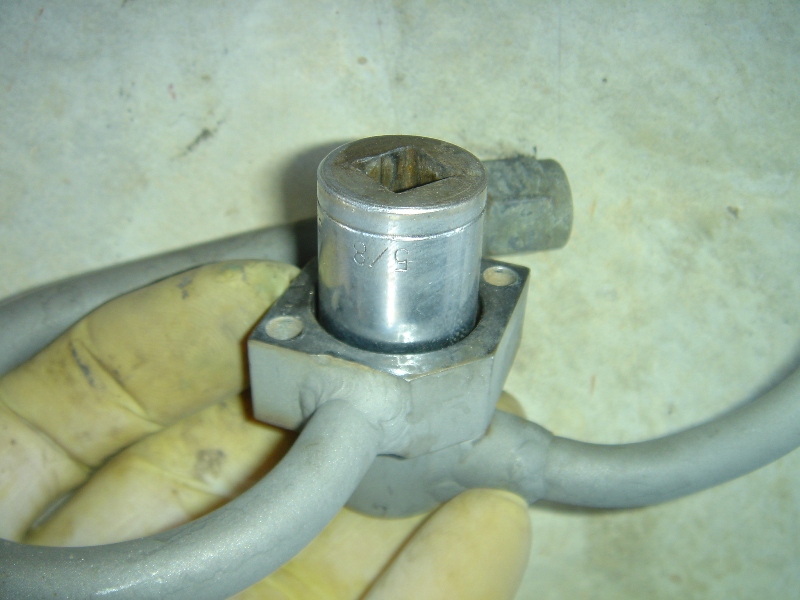
I removed the nozzle with a
5/8" socket.
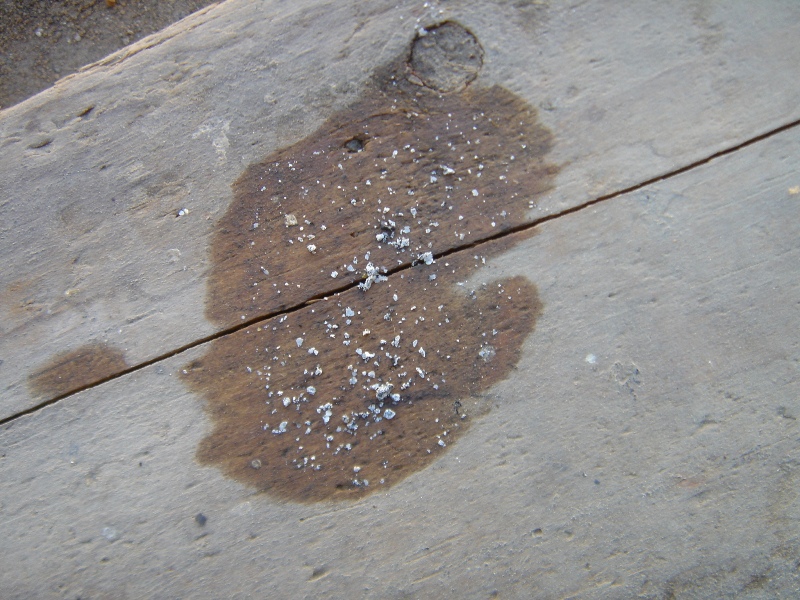
Here are the dirty and nasty
things that were found in my neglected heater nozzle (your humble
CSOB is guilty of 5 years
of neglect and the CSOB before me is guilty of a number of years as
well). This definitely impeded
proper fuel flow and spray pattern atomization for my heater
performance.
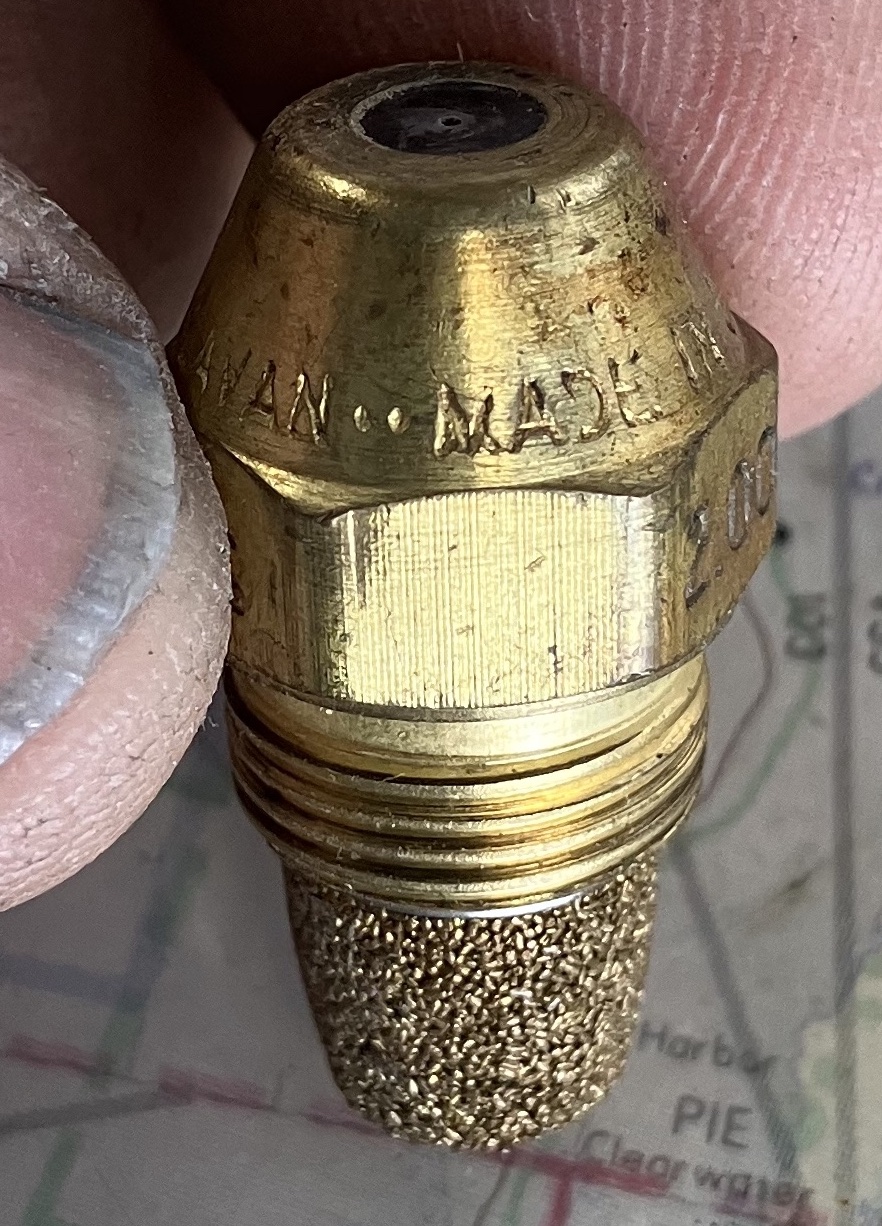
New Replacement Nozzle Available
Here are thoughts from frozen
tundra Baron owner, Richard S. who obviously knows how important keeping his
heater in shape is to flight in winter months:
When you unscrew the filter from
the nozzle, you'll might find some junk inside the nozzle, too. There are a
couple of little parts inside it that control the flow and the spray pattern.
They unscrew from inside the nozzle. The C&D folks said that when those tiny
passages inside get disrupted, the flow reduces, the fuel spray pattern distorts
and the fuel won't light off, even faced with the fireworks from a nice new
spark plug.
Cleaning the nozzle is not in the
annual inspection list, but it's shown in the heater maintenance section of the
shop manual. It is a pain to get it out of the heater, but the C&D folks
recommended doing it every couple years to make sure the nozzle is clean. They
said it's the number one cause of intermittent heat. So, I just plan to do it
every other year, taking the nozzle apart and ultrasonic cleaning it and the
tiny bits inside it. The heater is pretty much a go/no-go item up here in the
frozen tundra.
There is a conventional sump
drain filter in the fuel line downstream from the heater fuel pumps. It's just
like the main sump drain in a Bo. It's supposed to be sumped before flight and
disassembled and cleaned every annual. Apparently it can't catch everything.
Here's the shop manual text:
Cleaning the Spray Nozzle
1. Disassemble the spray nozzle
by unscrewing the fuel strainer and two piece core from the nozzle body.
2. Clean the parts in Stoddard
solvent.
3. If soaking fails to thoroughly
clean the parts, scrub them with a soft, non-metallic brush.
4. The grooves in the core and
orifice in body, may be cleaned with a soft pointed piece of wood.
Stay warm!
Of course, you can clean the
old nozzle and make it serviceable again (the Beechcraft
Maintenance manual approves
this), however, I used myEmergency Revocation
powers to
revoke my CSOB card when I was buying the spark plug and purchased a new nozzle as well.
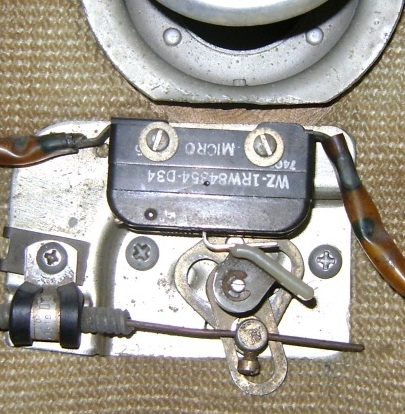
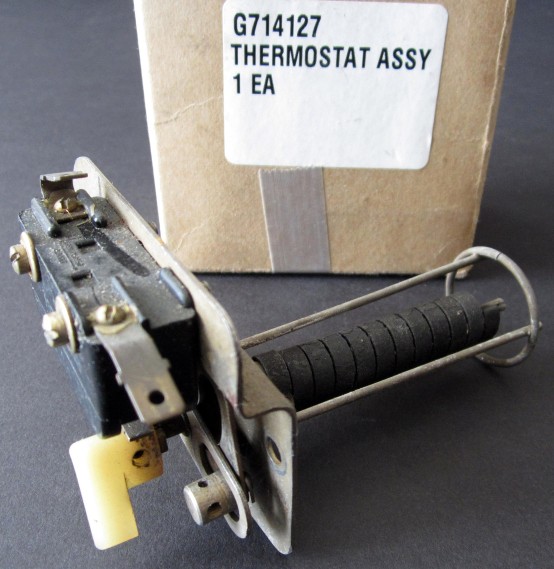
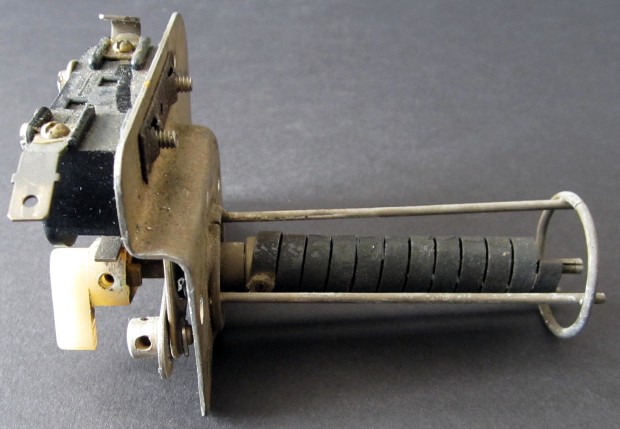
Pictured above is the
Thermostatic Limit Switch assembly. It is PN: G714127. It is located just above the
co-pilot's rudder pedals and just under the
firewall air vent where you can hardly reach it (big surprise
).
Here are additional pictures of
the thermostat assembly.
The cable determines the set
point at which the heater will cycle on and off. The little cam with the
white plastic molded lip is
connected to a coil that sits in the heater plenum and turns as the plenum
heats up and cool down,
thereby actuating the micro switch. The micro switch in turn passes power to
the fuel
solenoid valve (the solenoid shut valve is just downstream of the fuel pumps in the nose gear
well) which opens
to allow fuel flow to the heater in the presence of 24 volts.
This micro switch PN is no longer produced, so if you have a failure here you may have to
search out
some alternatives. Here is what Beech lister and B55 Baron owner Richard S. found
that might be able
to be modified to work:
The above is: WZ-2RW822-A2.
Available from Mouser
HERE The pdf Data Sheet is
HERE
Always be sure any part
substitution is approved by your A&P/IA for return to service. A review of the
AC 23-27 Parts and Materials
Substitution Guidelines could be worthwhile.
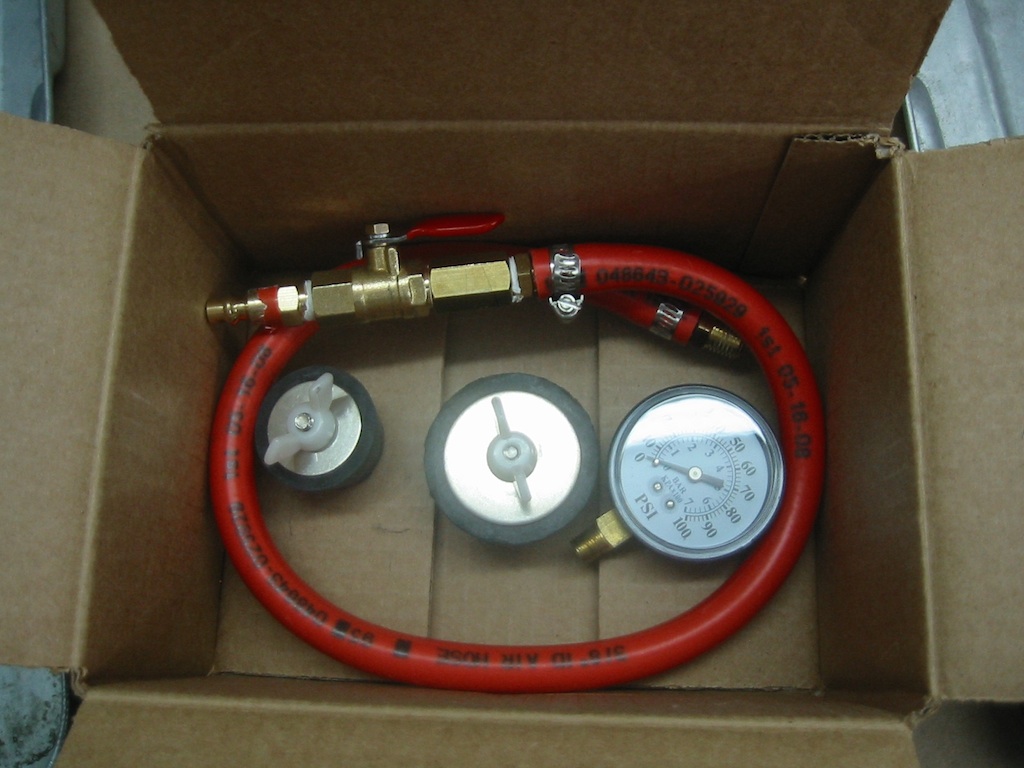
Below is a picture of the hideous location
of the 5 amp overtemp glass fuse holder and the spare. This is the fuse that
will blow if you get really enthusiastic about having heat with an S50 that has
not had the thermostat adjusted so that it WON'T overtemp! You will need to be a
very agile person, a small child or have a chiropractor at the ready to reach
this fuse. The best way to describe the location would be to say that it is
located just above the firewall opening where the big battery bus cables enter
the cabin.
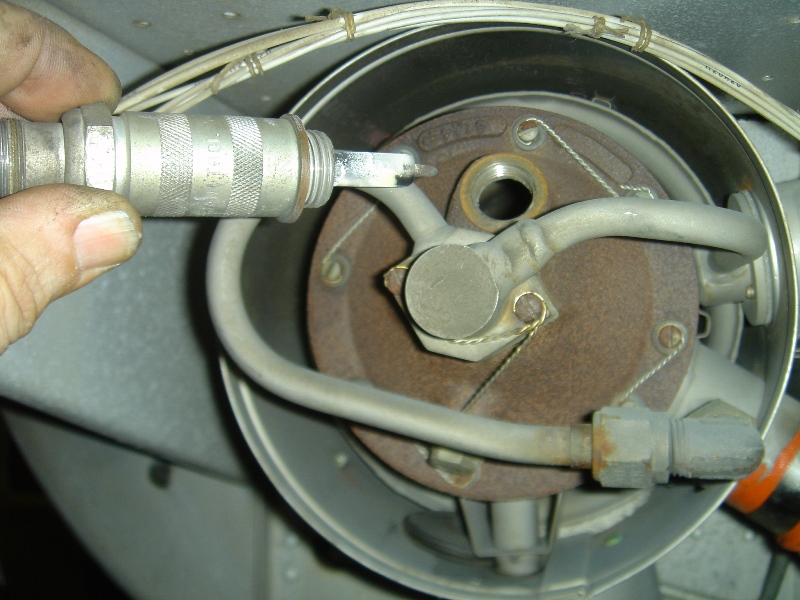
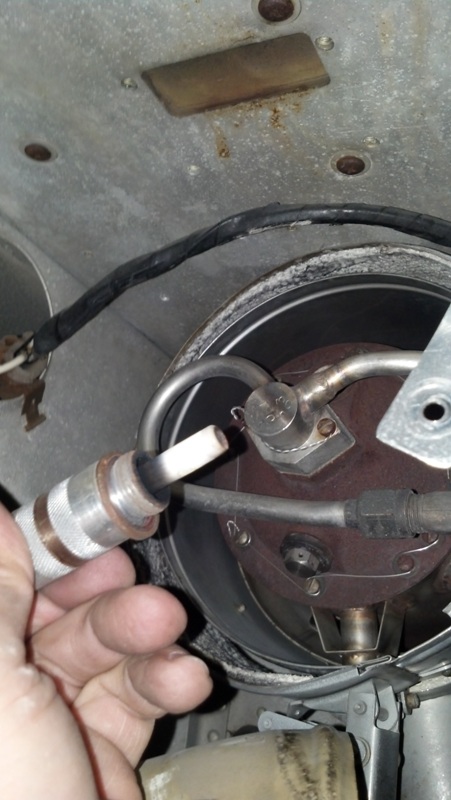
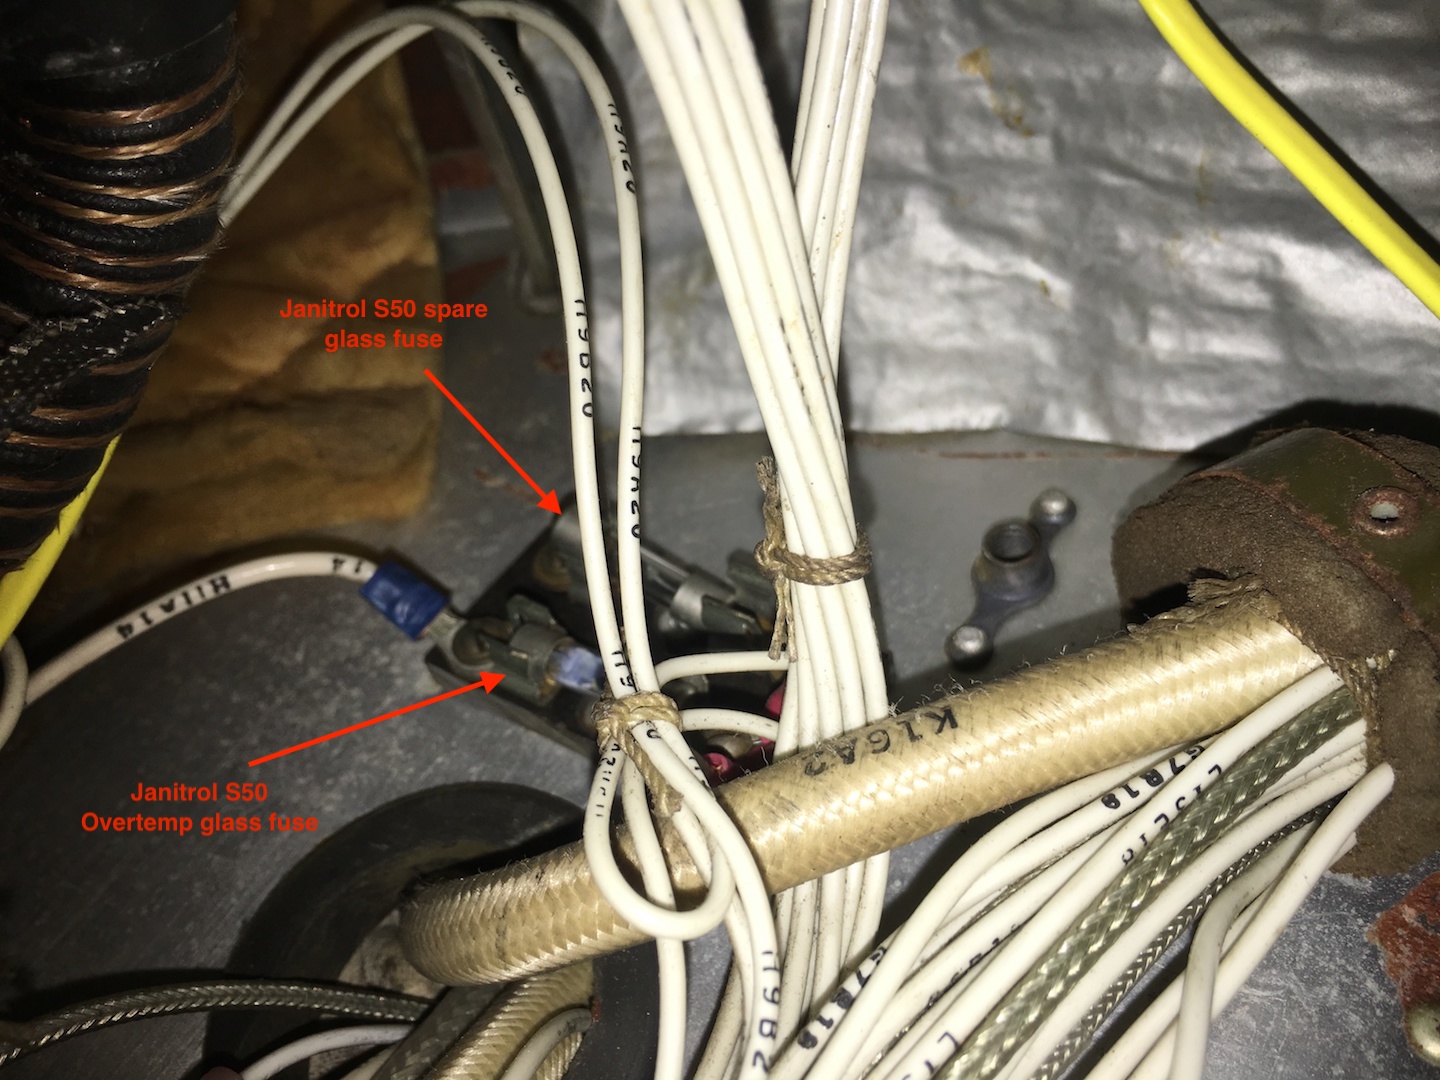
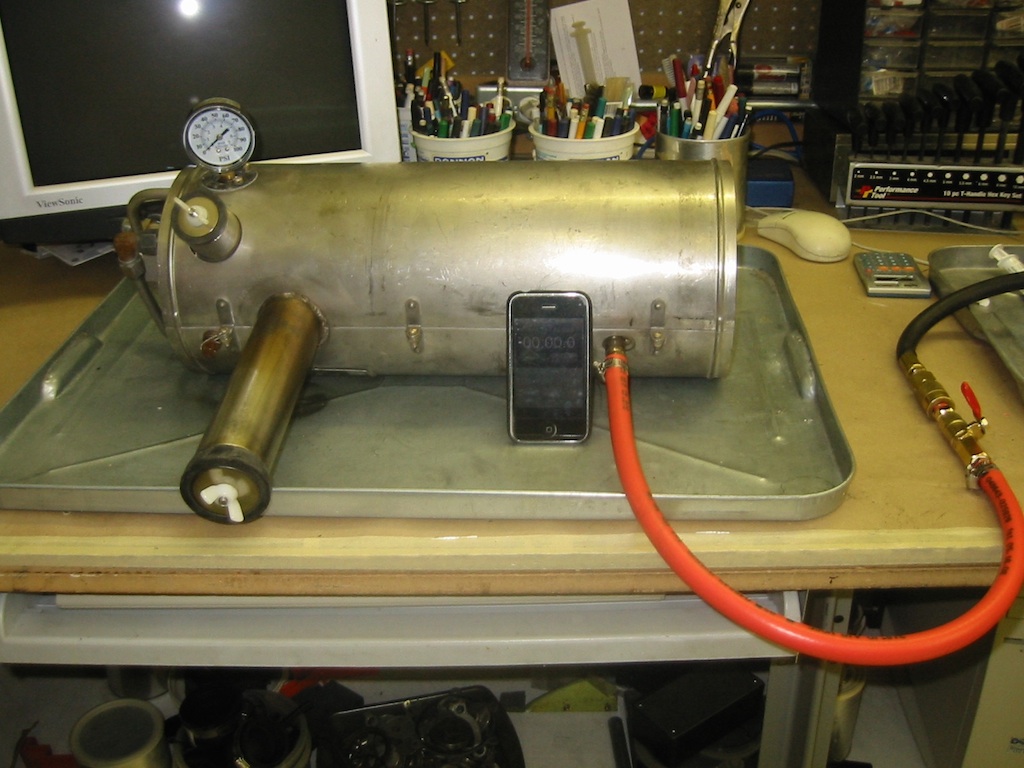
DIY Janitrol Pressure
Decay Test Tools
Contributed by Baron B55 owner, Jon B, below is his Janitrol
pressure decay DIY tool set up. Easy to duplicate, he sourced the plugs from a
swimming pool supplies store. Here is his narrative:
"My heater is the "S" series D83-A28 (S-50) that is not affected by the A.D.
I like to check the integrity of the combustion tube every annual anyway. This
model heater was used on the earlier Barons, you may not have this same model,
so my PDT setup may not work, or you might have to improvise some additional
components.
The setup on mine is simple, you can do it on the airplane, you just attach
your compressed air source to the fuel drain tube and a pressure gauge with
appropriate plumbing in place of the fuel inlet line. Pressurize to 6 PSI and
time the leak down to 1 PSI. YMMV..."
Baron Owner, IA & ABS Member
Stuart Spindel Janitrol Heater Narrative
Old style Janitrol heaters (S50) were used
thru 1973 models. Very good and robust.
Downside was the rather expensive ignition
unit. Coils still available, vibrator still available, now solid state.
Back in the fifties, when the gasoline powered
twins were big Commanders, Twin Bonanzas, Queen Airs, Beech 18, Lockheed
Lodestars and such, the Janitrol heaters were popular. The smaller twins got
Southwind heaters, but Beech elected to use the Janitrol, but one with a smaller
fuel nozzle that was essentially a derated heater.
The newer heaters have several advantages over
the older models, but robust cans (combustion tubes) is not one of them.
Yes, there is no AD on the older heaters, but
somewhere between an over cautious two-year check and never checking at all, is
a reasonable interval. Four years seems about right.
The pressure of the outside air that surrounds
the tube as it flows around the heat exchanger remains higher than the pressure
of the burning fuel-air mixture. Cracks will let vent air into the combustion
tube, not the other way around.
Your ignition coil/vibrator is
TU?
Here is a pirep from Baron
owner Joe B.:
The culprit was the ignition
coil, PN 11C30-1. It was not very expensive by aviation standards. I
shipped the old coil and wire
to Aircraft Heating and Electrical, 1635 Beltline Road
in Redding, CA
96003 916-246-HEAT (4328).
They tested my old coil on the bench
and it would work, then shut down when it got hot. After it
cooled off, it would begin working
again. The coil is supposed to fire all the time, even when the
thermostat has cut off heater.
They shipped me a new coil and wire. Problem was solved.
If you've found this content useful, even though you're a card-carrying
CSOB, please consider a
secure PayPal donation by clicking the "Donate" button to defray some
of my expenses.