Does your Beechcraft Bonanza, Baron or Travel
Air Door handle stick out from the airframe?
Well here is the adjustment procedure,
courtesy of a pirep from Kevin O. Kevin has done a live demo on this adjustment
at the ABS tent at OSH for a couple of years. Here are his tips for your A&P to
review:
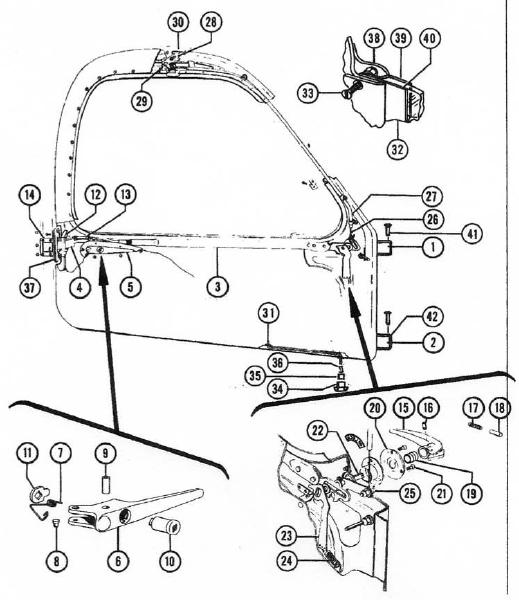
1. Remove upholstery from the door which
exposes the inside door handle mechanism (you can see it through the small
triangular opening) - if you can't do this without screwing things up - STOP
NOW.
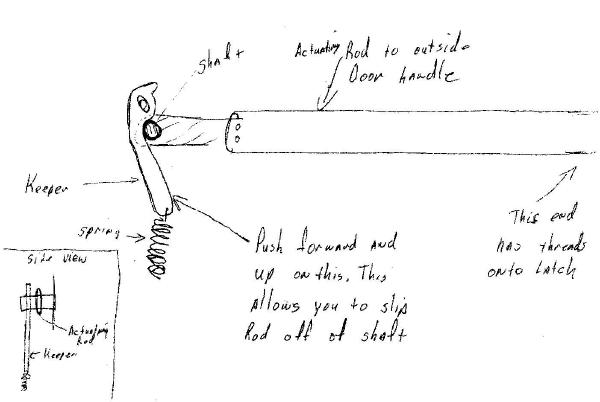
2. To make the next step easier, unlatch the door, rotate handle to the closed
and latched position while the door is open. This will make it easier to get the
rod off. Use a screwdriver or needle nose pliers to pry the keeper arm forward
and up so that you can slide the actuator rod off the shaft.
3. Turn the rod counterclockwise 1/2 turn.
This makes it longer.
4. Push the keeper out of the way and
reinstall the rod on the shaft.
5. Actuate the inside door handle to the
locked position and see if the outside handle goes flush. If it does not - try
another turn on the rod.
6. If someone has tried to force the door open
and bent things up - it is a whole
new set of problems. If it takes more than 3 full turns it is more than a simple
adjustment.
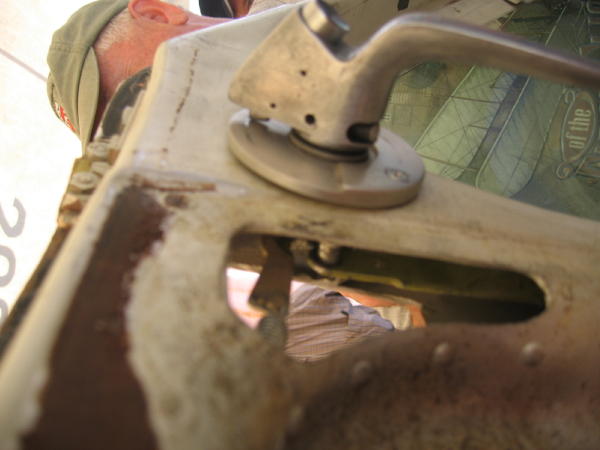
Kevin hiding in back.
Triangular opening is below door handle. Rod at upper edge of opening
is what needs to be turned. Kevin cut a hole in the opposite side to
see a little more easily how the keeper slides off.
Thanks Kevin for another great contribution
to the Beechcraft community.
HERE is
a pdf describing an exercise in futility of a G36 owner (Parvez D.) when he
tried to adjust his door. Maybe it could shed some light for you if you find
yourself in the same predicament.
Broken Door
Handle Spring Replacement
OK, so your exterior door handle
hangs limp because the original spring has snapped after some 40 years of use?
Gee you'd think that Beech engineers could have given us a design that could
last at least 80 years! LOL
Well here is a procedure
narrative by Beech Talker
Marty M:
SUCCESS!!! Amazing, after a day and half of hard work, the new
spring is installed! Thanks to all for your help. Now I can replace one in about
30 minutes. Here's what I did even though I might have removed more than
necessary:
Disasssembly
1> Remove interior door panel
2> Remove aft left lower screw from exterior of door handle perimeter.
3> Remove aft screw from exterior of door handle perimeter.
4> Remove clevis pin from interior that the exterior door handle hinges upon.
5> Remove exterior door handle and broken spring.
6> Remove aft door latch and rod assembly by disconnecting lower latch rod,
latch block, and at interior door handle mechanism (as published by Kevin).
Removes out the door to the rear.
7> Remove old spring and install new spring in exterior door handle by pressing
out bushing and pressing back in with new spring.
8> Temporarily install the exterior door handle with clevis pin.
9> Secure clevis pin with aft lower left exterior screw.
10> Use a needle nose pliers to locate the hooked end of the spring between
layers at the aft screw location.
11> Install the aft screw to secure the spring.
12> Remove the aft lower left screw and clevis pin to allow the handle to move
out of the way while installing the latch and rod assembly.
13> Hold the handle outward while installing the latch rod assembly.
14> Reconnect the handle to the 2 slotted arms.
15> Position the handle while re-installing the clevis pin.
16> Install the aft lower left screw (to secure the clevis pin).
17> Reconnect and adjust everything that you moved in the process.
18> Viola - your spring has been replaced successfully.
There might be an easier way. One process I though of is this:
1> Do steps 1-5 above.
2> Install the new spring hooked end into position thru the exterior door handle
location.
3> Secure with aft screw.
4> Press out bushing on door handle to remove old spring.
5> Hold door handle close enough to new spring (that is already attached to your
plane) and press in the bushing.
6> Install clevis pin and slotted arms.
7> Done.
Here is key tip on the door handle spring
replacement provided by Rob K. on
BeechTalk
I saw the door demonstration at Oshkosh
by Kevin and I noted at the time there was a "trick" to make it easier. I
recollect you needed to remove a single screw at the end of the door where the
door latch/pin comes out. If you look at the end of the door you will see this
lone screw seemly doing nothing. It holds all of the door mechanism from sliding
forward. Once removed you can get at the spring etc pretty easily buy sliding
the mechanism into view. Until I did this I could not figure out how I would get
to the spring without taking everything out of the door.
HERE is an
excellent photo narrative by Dan MacDonald of Beech Talk. This really puts it
all in perspective! Check out his book coming in July 2011 at
www.aircraftmaint.com
Check out some door adjustment
secrets in this article
HERE by Dennis Wolter of AirMod
Check out the Door Lock Cylinder
replacement narrative HERE
I have been waiting six years to figure this out
and each time I tried I just stared at the door and mechanism for about an hour
and could not figure it out. I'm going to get to work and with Dan's excellent
pictures, I think I can get it done.